Disclaimer! The project is just a reference in order to show possibilities of ctrlX CORE for ROS 2 application with Kassow Robots and not intended for actual production use! It should be modified and tested by experienced user in order to adapt it for actual use.
Prerequisites:
ctrlX CORE X5/X7 2.6.X/3.6.X
SSH access (root user) on ctrlX CORE
Kassow Cobot with OnRobot gripper
KORD API Drivers
Description files of Kassow and Gripper
Basic understanding of ROS 2 Movelt from our How-to
Understanding of Snapcraft
Ubuntu 22.04 LTS PC
Customized CBun for Gripper control (see another How-to guide)
Xbox Series Joystick and USB to USB C adapter, optionally can use another model
1. Concept
The project is demonstrates pick and place control of Kassow Cobot along with a manual Joystick teach mode for setting up pick, place, and home positions. Please note that this project uses SSH access whit the root user. For security reasons, it is intended for development and demonstration purposes only and is not for production deployment.
It's based on the How-to for controlling Virtual Panda robot arm - ROS2 demo example - MoveIt2! in ctrlX OS
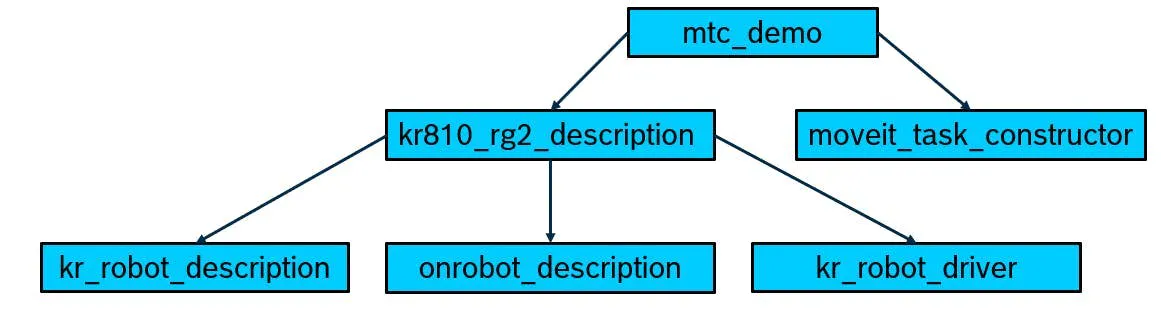
In the base project we have the packages 'moveit_task_constructor/' and 'mtc_demo/', we will modify mtc_demo/ to work with Kassow specific drivers.
Additional packages that need to be added:
kr_robot_description - Kassow URDF, meshes, etc.
kr810_rg2_description - Complete Moveit configuration, URDF including the gripper, SRDF
kr_robot_driver - ROS2 Control hardware plugin for use with the ROS2 - agnostic KORD API
onrobot_description - RG2 gripper URDF and meshes
2. Kassow Description
There are two possible ways to acquire the URDF description files for your Kassow robot. The first option is to request official description files from Kassow, please contact your local sales representative to obtain them.
The second option is more advanced. You can create these files from scratch. To do so, you will need the CAD files of the robot and a specialized CAD tool such as SolidWorks with the URDF exporter extension. In that case you will need to define all joint positions manually, export the model as a URDF file and define the joint limits, masses, and inertias.
In this guide, we assume that you already have a basic Kassow Robot description package.
2.1. Gripper Description
The same applies to the gripper description files. At this point, we assume that all required description files are already available. In the current project we are using TCP socket-based gripper control.
3. Joystick support
We will use it to jog the robot arm, manually control the gripper, teach the pick, place and home positions.
You will need an Xbox Series controller or a similar device. When using a different model verify that the USB port of ctrlX CORE provides sufficient.
The 'joystick_control' package should be included in your workspace
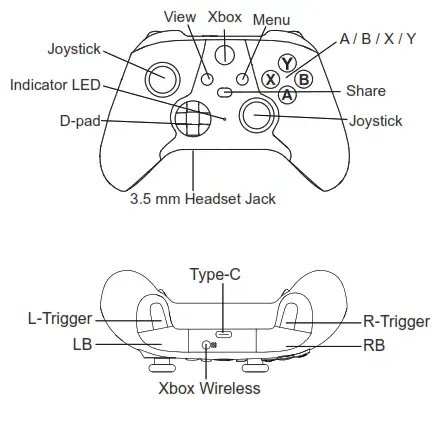
We are going to implement following features:
Left stick - move robot in X/Y plane
LT/RT - move in Z plane
Right stick - roll/pitch/yaw rotations
LB/RB bumpers - rotate along Z axis
A - open gripper
B - close gripper
X - teach pick position
Y - teach place position
Share - teach home position
D-pad left/right - set velocity scale percentage
D-pad up/down - set gripping width
View - switch modes between teach and MTC execution
Menu - start MTC task execution
The consolidated launch file includes these configs:
4. Project structure
Top-level layout
Path
Type
Purpose
build-snap.sh
script
Full build: runs colcon-build.sh, then snapcraft --destructive-mode
colcon-build.sh
script
Sources ROS Humble, checks libnet1-dev, runs rosdep install, then colcon build --mixin release --merge-install
install_moveit_servo.sh
script
Helper: apt install ros-humble-moveit-servo on the dev machine
visualization_demo_kr.sh
script
Dev-PC helper: sources local workspace and launches the RViz visualization launch file
data/taught_positions.yaml
data
Example/seed taught positions (home/pick/place joint states + gripper width) written by teaching mode
snap/snapcraft.yaml
packaging
Snap definition (ros2-moveit-mtc-kr810): dumps ./install, stages MoveIt/ros2_control debs, defines the two apps and the ros-base content plug
wrapper/setup-paths.sh
script
Runtime env inside the snap: PYTHONPATH/LD_LIBRARY_PATH against the ros-base content snap, sources setup files
wrapper/run-joystick-mtc-complete.sh
script
Snap app entry point → ros2 launch mtc_demo joystick_mtc_complete.launch.py (forwards args like use_fake_hardware, robot_ip)
wrapper/run-visualization-kr810.sh
script
Snap app entry point → ros2 launch mtc_demo visualization_kr810.launch.py
src/mtc_demo — application package (top of the stack)
File
Purpose
src/mtc_node.cpp
MTC task node: Loads taught positions from taught_positions.yaml, builds the pick→close→place→open→home task, serves /mtc/execute_task (trigger), called by joystick Start button
scripts/onrobot_tcp_controller.py
ROS2 node bridging the GripperCommand action (rg2_gripper_controller/gripper_cmd) to the OnRobot RG2 via JSON-over-TCP (grip / get_width / is_object_detected)
launch/joystick_mtc_complete.launch.py
Main system launch: move_group (+ ExecuteTaskSolution capability), robot_state_publisher, ros2_control node + controller spawners, TCP gripper controller (real mode), mtc_node, joystick + servo + servo starter; switches fake/real via use_fake_hardware
launch/visualization_kr810.launch.py
RViz-only launch with the KR810+RG2 MoveIt config (dev visualization)
CMakeLists.txt, package.xml
Build/deps; installs mtc_node, the Python gripper controller, launch files, and the data/ directory
src/joystick_control — teleoperation package (Python)
File
Purpose
joystick_control/joystick.py
Scans /dev/input/event0..15, picks a gamepad by device name, non-blocking reads of axis/button events
joystick_control/joystick_teleop_node.py
Main teleop node: normalizes axes (deadzone, adaptive trigger range), velocity ramping + exponential smoothing, publishes TwistStamped to servo at 50 Hz; button logic — teaching-mode toggle (pauses/unpauses servo), save home/pick/place to taught_positions.yaml (in $SNAP_USER_DATA), gripper open/close via GripperCommand action, D-pad speed/width adjust, Start triggers the MTC task service
joystick_control/start_servo.py
One-shot node that calls /servo_node/start_servo at startup
config/joystick_teleop_params.yaml
Teleop parameters (max velocities, deadzone, update rate)
config/moveit_servo.yaml
MoveIt Servo config: 50 Hz trajectory output to /kr810_arm_controller/joint_trajectory, group kr810_arm, base frame control, collision checking disabled
launch/joystick_teleop.launch.py, launch/servo_node.launch.py
Standalone launch files for teleop/servo (superseded by joystick_mtc_complete.launch.py; not installed by setup.py)
setup.py, setup.cfg, package.xml, resource/
ament_python packaging (console entry points joystick_teleop, start_servo)
src/kr810_rg2_description — combined robot MoveIt config
File
Purpose
urdf/kr810_rg2.urdf.xacro
Top-level URDF: world → KR810 arm → RG2 gripper, includes the ros2_control block
urdf/rg2_gripper.urdf.xacro
RG2 gripper model: rg2_hand, prismatic left_finger_joint (actuated) + right_finger_joint (mimic), meshes
urdf/kr810_rg2.ros2_control.xacro
ros2_control system: selects mock_components/GenericSystem (use_fake_hardware:=true) or kr_robot_driver/RobotSystem (real, with robot_ip/robot_port)
config/kr810_rg2.srdf
Planning groups (kr810_arm, rg2_gripper, combined), end effector rg2
config/ros2_controllers.yaml
controller_manager config: kr810_arm_controller, rg2_gripper_controller (JTC), joint_state_broadcaster
config/moveit_controllers.yaml
MoveIt controller map for real hardware: arm = FollowJointTrajectory, gripper = GripperCommand (served by onrobot_tcp_controller.py)
config/moveit_controllers_fake.yaml
MoveIt controller map for simulation: both controllers FollowJointTrajectory, trajectory monitoring disabled
config/kinematics.yaml
IK solver (KDL) settings for kr810_arm
config/joint_limits.yaml
Position/velocity/acceleration limits used by MoveIt (robot limits minus safety margin)
config/initial_positions.yaml
Initial joint values for mock hardware
config/ompl_planning.yaml, config/pilz_cartesian_limits.yaml
OMPL planner and Pilz Cartesian limit configs
meshes/
RG2 gripper STL/DAE meshes
src/kr_robot_driver — Kassow hardware driver (ros2_control)
File
Purpose
hardware/kr810_hardware.cpp + hardware/include/.../kr810_hardware.hpp
kr_robot_driver/RobotSystem hardware interface: connects to the robot over the KORD API (UDP), read() fetches joint positions/velocities, write() streams directJControl commands; arm only - gripper is handled separately by TCP controller node
controller/kr810_controller.cpp + header
kr_robot_driver/RobotController — tutorial-style trajectory controller (r6bot heritage); not used by the current launch (standard JTC is used instead)
kr_robot_driver.xml
pluginlib manifest exporting the hardware plugin and the controller
reference_generator/send_trajectory.cpp
KDL-based demo tool that generates and sends a test trajectory
bringup/launch/*.launch.py, bringup/config/*.yaml
Standalone bringup for the driver (kr810 / r6bot variants) — dev/test use, not part of the snap apps
description/urdf, description/ros2_control, description/launch
ros2_control description and RViz view launch (driver-local, distinct from kr810_rg2_description)
test/
pytest launch/URDF sanity tests
kord_api/
Kassow KORD API C++ library (UDP real-time protocol, examples, docs, bundled ASIO) — third-party, built via add_subdirectory
CMakeLists.txt
Builds kr_robot_driver shared lib (defines ENABLE_REAL_ROBOT), links kord-api, exports plugins
src/kr_robot_description — arm-only visual description
File
Purpose
kr810/urdf/kr810_description.urdf.xacro
KR810 arm URDF (links base…link7, end_effector) used by the combined description
kr810/meshes/a810/
Arm link meshes (STL/OBJ)
kr810/rviz/view_robot.rviz
RViz config for viewing the bare arm
src/moveit_task_constructor — dependency
Upstream MoveIt Task Constructor (Humble).
5. Build your project
Use 'colcon-build.sh' script to build your project and be able to debug the result locally through your Ubuntu 22.04 machine, with both fake and real hardware:
#make your script executable, if it's not already
chmod +x colcon-build.sh
#and run it
./colcon-build.sh
After build is successfully complete you will see folders /log, /install and /build in project root folder, you are ready to go.
6.1. Run with Mock hardware from Ubuntu 22.04 PC
Please use chapter 6.1. with button mappings for control functions.
To debug in RViz with mock hardware you will need to run two commands in separate terminals, in any order. In this case, the Joystick should be connected to your Ubuntu PC.
Terminal 1, complete launch task:
source /opt/ros/humble/setup.bash
source install/setup.bash
ros2 launch mtc_demo joystick_mtc_complete.launch.py use_fake_hardware:=true
Terminal 2, launch RViz:
source /opt/ros/humble/setup.bash
source install/setup.bash
ros2 launch mtc_demo visualization_kr810.launch.py
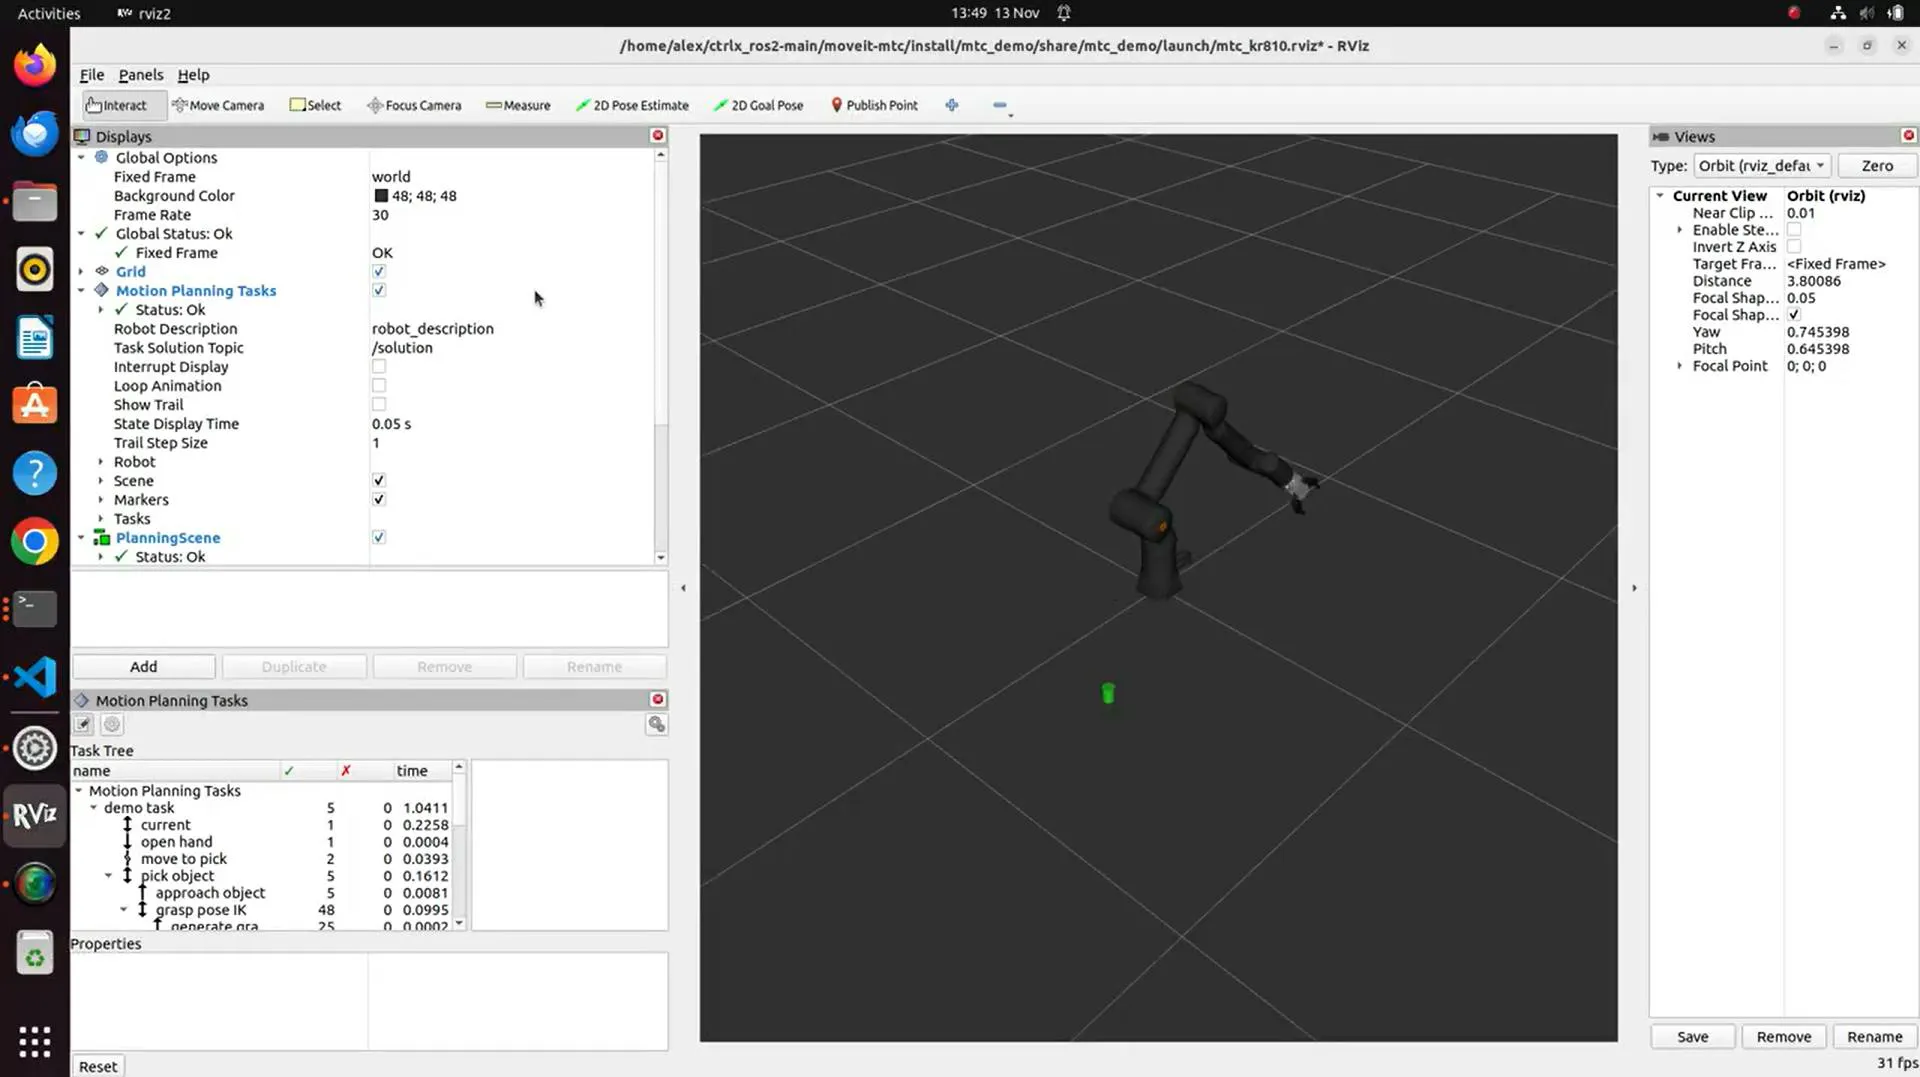
You will see your robot visualization:
6.2. Run with Real hardware from Ubuntu 22.04 PC
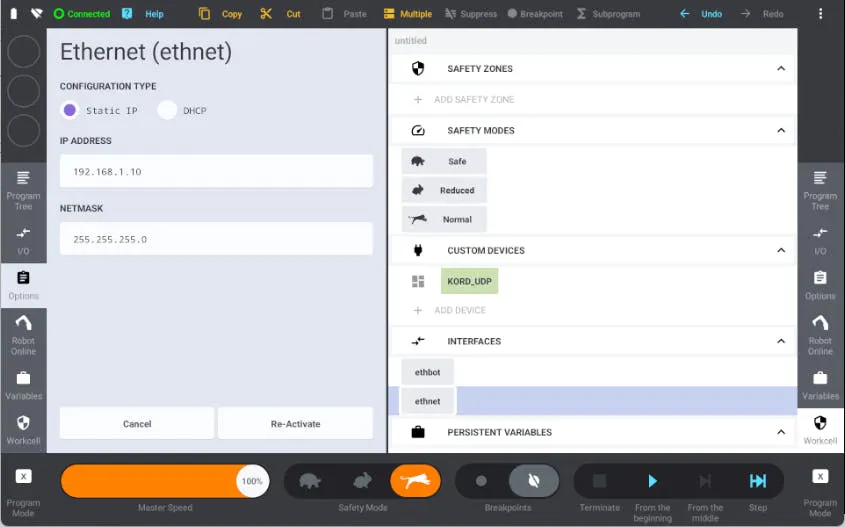
Before running the application, make sure that your Cobot is ready for operation. Connect the ctrlX CORE to Ethernet port of the Kassow robot and ensure that the network settings are configured correctly on both devices.
Modify the IP address in the Kassow Interfaces Workcell to match the network configuration of your ctrlX CORE, and then reactivate the interface.
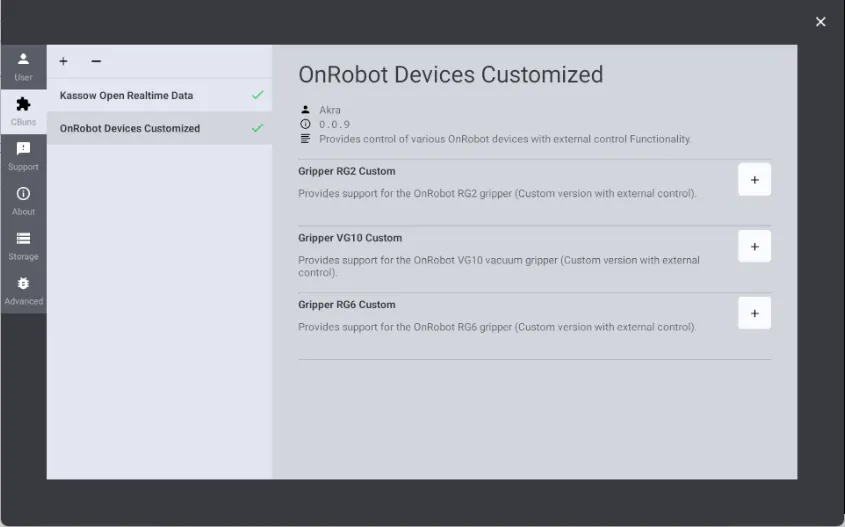
Install KORD API and our modified OnRobot Device CBuns with added TCP communication, add them to your workspace:
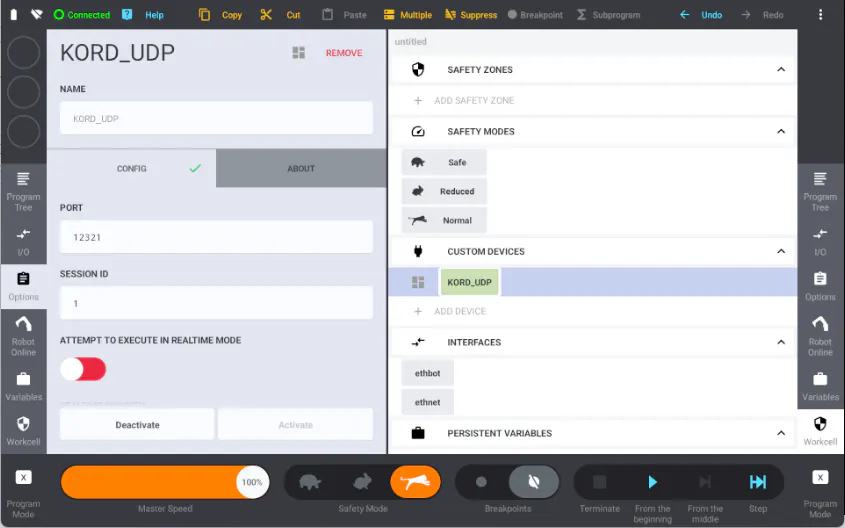
Activate KORD API CBun, our port is 12321 and session ID 1:
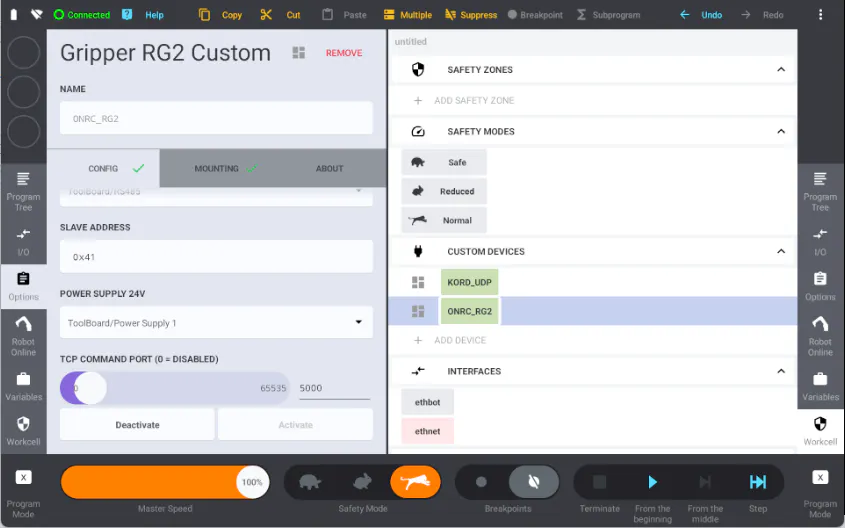
Activate Custom Gripper CBun, we use port 5000 to bypass control from Teach Pendant directly from ROS2 environment:
That's it, Kassow is ready to receive control commands!
ros2 launch mtc_demo joystick_mtc_complete.launch.py use_fake_hardware:=false robot_ip:=192.168.1.10If everything works, we proceed go to the next step
6.3. Build the project
Now we can run the script ./build-snap.sh (do not forget to make it executable). It will also rebuild our ROS 2 packages. Since we've already run colcon build and didn't modify anything since, let's just run snapcraft commands directly (I use snapcraft 7.X):
sudo snapcraft clean --destructive-mode
sudo snapcraft --destructive-mode
Wait for it to build and that's it, now you have .snap file in root folder of the project.
Just install the packages on your ctrlX CORE (base snap is same as in panda tutorial):

You will need to have ssh access and user set up to access the terminal for running command, login to your ctrlX CORE:
Joystick should be already connected to your ctrlX CORE, let's check if it's detected:
ls -la /dev/input/by-id/ | grep -i joyyou will see your joystick and its address, like /event5, let's run the sequence setting our robot IP and joystick address explicitly:
sudo ros2-moveit-mtc-kr810.joystick-mtc-complete robot_ip:=192.168.1.10 use_fake_hardware:=false joystick_device:=/dev/input/event5Video of the full running process:
Unfortunately, we are not able to share the complete source code here due to restrictions.
Have fun, but be careful! Remember that is just a demo project.
Related Links:
https://github.com/AKRA-off/ctrlx-os-snap-collection/tree/main/moveit-mtc_kassow_onrobot
GitHub - boschrexroth/ctrlx-automation-sdk: ctrlX AUTOMATION Software Development Kit
GitHub - boschrexroth/ctrlx-automation-sdk-ros2: ctrlX AUTOMATION Software Development Kit for ROS 2
ctrlx_ros2/moveit-mtc at main · rcruzoliver/ctrlx_ros2 · GitHub
ROS2 demo example - MoveIt2! in ctrlX OS
