ℹ️ Info
This is part of our premium features: The Premium features are currently in Beta test, to try out please contact your Sales Support partner or send an email to [email protected]
IntroductionQuick Guide - Use Cases OverviewCreate templates via ctrlX Device PortalSave device as templateAssign templateAssign LicensesAdditional NotesCreate Templates via APISave device as templateGet device setup infoCustomize your TemplateCreate the TemplateTrack Template creation progressGet template detailsApply TemplateAdditional Notes - Assign LicensesAPI detailed specificationsGet Current Device Setup Info Save device as templateGet template detailsGet task by IdApply device templateGet Device detailsAdditional Notes - Assign LicensesSupportRelated links
Introduction
The template feature allows you to quickly create a stable base from a properly configured device and apply it across multiple devices. Instead of manually configuring each device, you can prepare one fully configured device and reuse it as a template.
In addition you can also use one of our Ready-to-use templates that is a template previously configured and tested by Rexroth.
This ensures consistency, saves time, and simplifies large-scale deployments.
Quick Guide - Use Cases Overview
1. Preconditions / Setup
Before creating templates, ensure that one device is already configured with the desired properties:
System and User Apps
App data
Network settings
Security settings
System settings
2. Save as template
Go to the configured device details page in ctrlX Device Portal and save it as a template
3. Assign
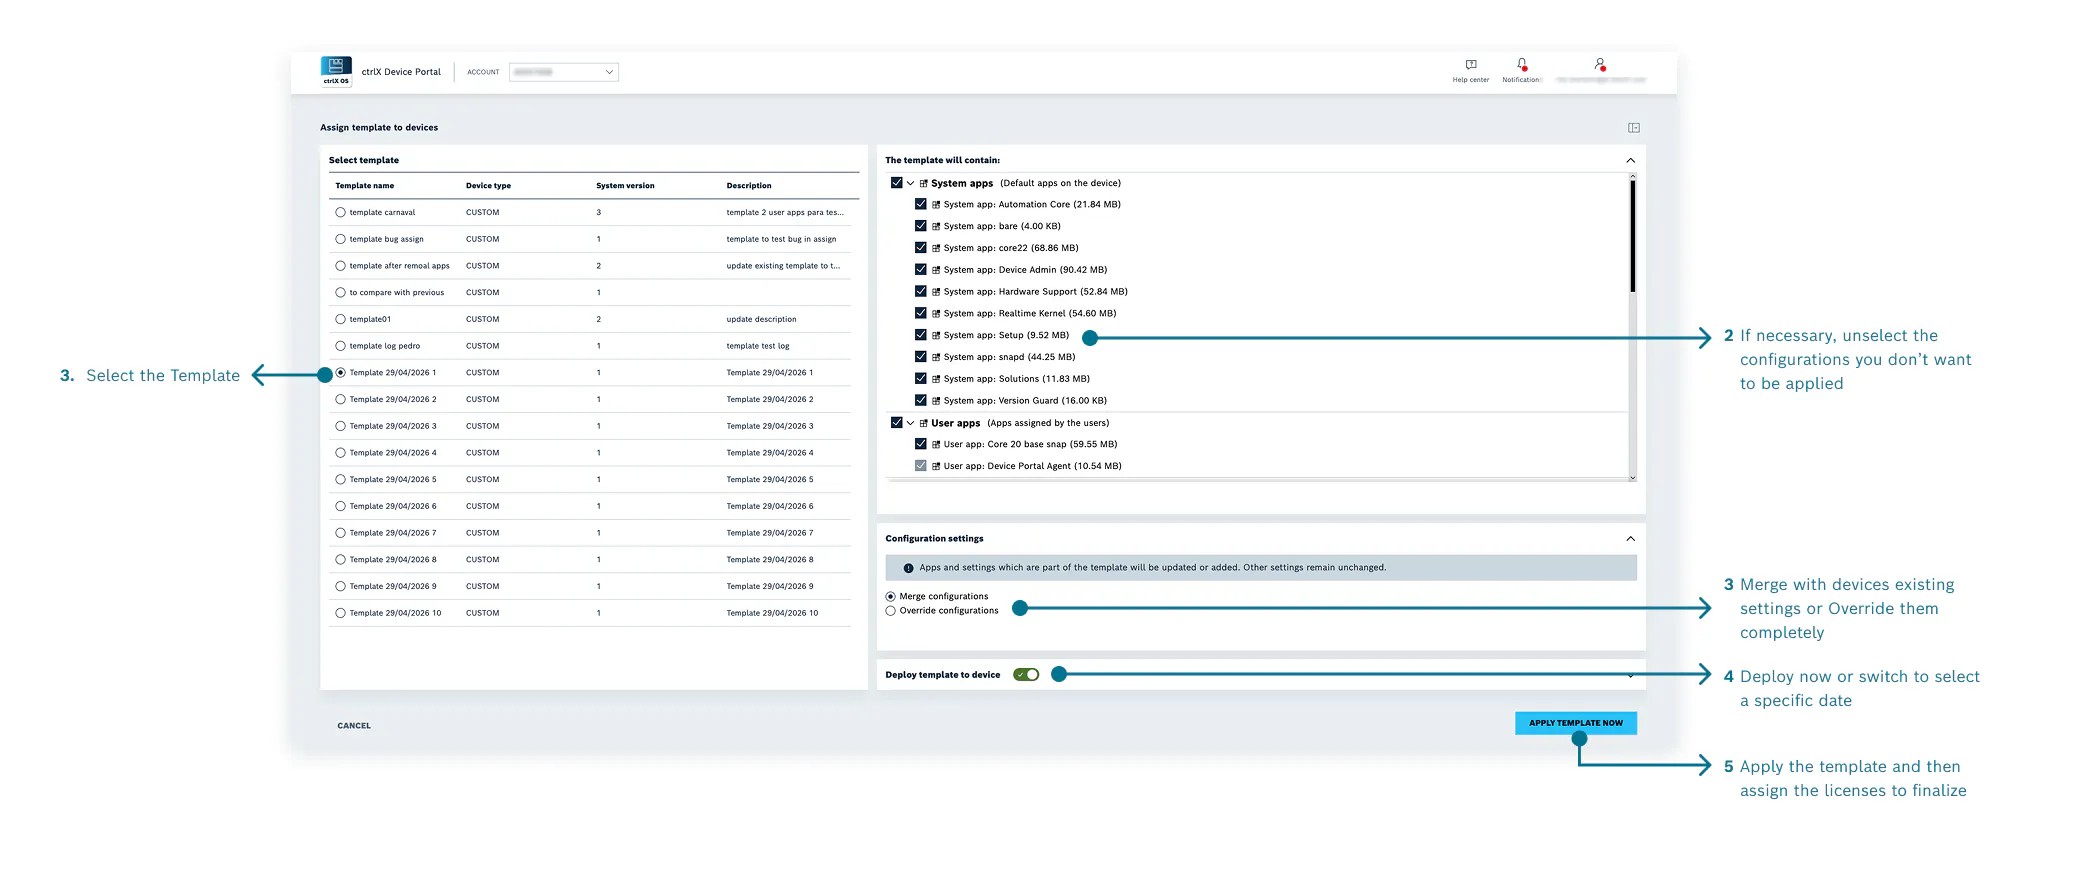
From the Devices Overview page, select all target devices. Click Device Options and then Assign Template
4. Customize (optional)
In the template view, unselect any configurations you do not want to apply
5. Apply
Choose to merge with existing settings or override them completely
6. Deploy
Use the "Deploy now" or "Schedule" options to start the process
7. Assign Licenses
After deployment, click Assign License to complete the device setup
Create templates via ctrlX Device Portal
Save device as template
Go to your fully configured device details page
Click the 3-dot button and select "Save as template"
Give the template a name and description and remove any configuration that you do not want to save, if necessary
Click "Save as template" and the template will be available in your Templates list (this may take a few minutes. You can follow the progress in the Activities page)
Assign template
From the Devices Overview page, select all target devices.
Click Device Options
Select Assign Template
You can also assign the template by going to the device details page and clicking the 3-dot button.
Customize the Template
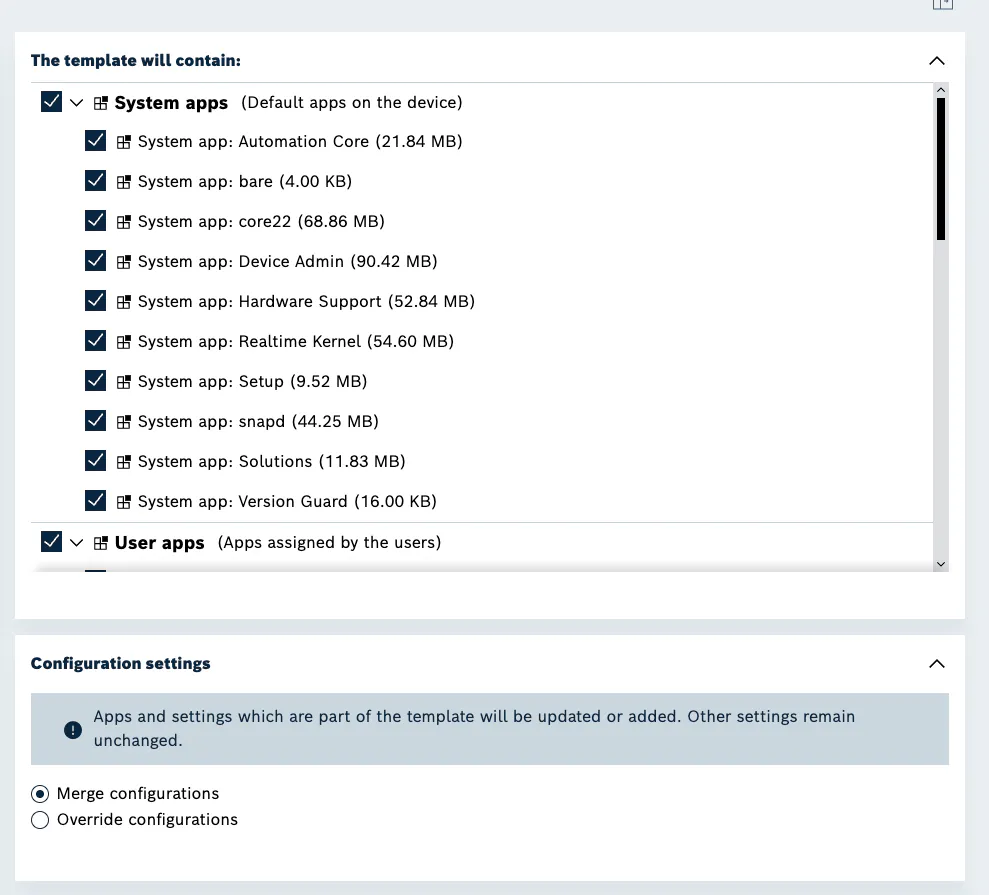
Even after selecting a template, you can adjust what gets applied:
Deselect any configuration you do not want to include
Choose how the configuration is applied:
Merge: Add and replace only the new configured settings
Override: Replace all the device existing configuration
Apply and Deploy
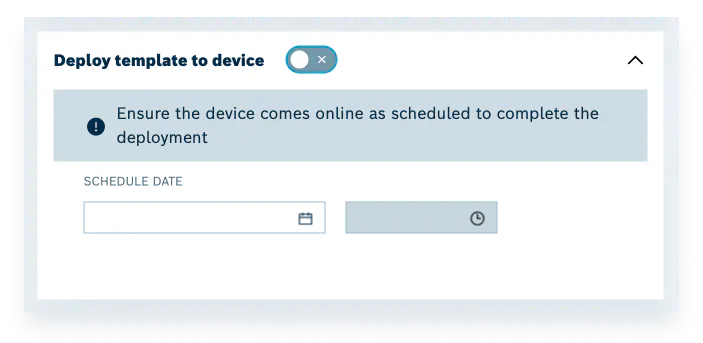
You can choose to deploy immediately or schedule the deployment. The deployment follows the same behavior described in the Deployment Guide:
If the device is online, the deployment occurs immediately.
If the device is offline, the deployment will continue attempting to process for up to 2 days. After this period, the task will fail.
Assign Licenses
⚠️ Attention: Templates do not include licenses. After triggering the deployment, ensure that the device has the necessary licenses to function properly.
Additional Notes
Templates are ideal for scaling configurations across many devices quickly
You maintain flexibility by customizing each template assignment before applying it
Deployment tracking and status updates are available on the Activities page
Create Templates via API
Save device as template
Prerequisites
Before you begin, make sure you have the following credentials ready:
Retrieve a valid JWT from Keycloak https://id.auth.boschrexroth.com/auth/realms/dc/.well-known/openid-connect
Get a valid Subscription Key provided by the ctrlX Device Portal Team
Get the Device ID
Step 1: Get the Device ID
Retrieve the deviceId using one of the following methods:
Option A: Via ctrlX Device Portal
Open the ctrlX Device Portal
Copy the ID from the Serial Number column
Option B: Via the Device's Web Interface
Open the device web interface and go to Settings
Click on the System Information section
Locate and copy the Device ID under the Type Plate section
Step 2: Request the Device Setup Info
Once you have your credentials and deviceId:
Make the request to retrieve the setup info of the device.
Use this retrieved setup info as the baseline configuration for your new template.
Get device setup info
Request
 curl -X 'GET' \
  'https://api.ctrlx-deviceportal.boschrexroth.com/iot-device-services/v1/devices/<DEVICE_ID>/setup/setupinfo' \
  -H 'accept: application/json' \
  -H 'Ocp-Apim-Subscription-Key: <YOUR_SUBSCRIPTION_KEY>' \
  -H 'Authorization: Bearer <JWT_TOKEN>'
Response
{
  "$forceReboot": false,
  "$name": "",
  "$schema": "./setup.v1.schema.json",
  "$version": "",
  "apps": {},
	(...)
  "packageManagement": {
    "allowUnknownApps": true,
    "installedApps": {
      "bare": {
        "appType": "base",
        "description": "",
        "size": 4096,
        "summary": "Empty base snap, useful for testing and fully statically linked snaps",
        "vendor": "Canonical",
        "version": "1.0"
      },
		(...)
      "rexroth-deviceagent": {
        "appType": "app",
        "description": "This app is designed to provide device information, allow remote access and software updates.",
        "size": 39555072,
        "summary": "App for remote access and real time updates.",
        "title": "Device Portal Agent",
        "vendor": "",
        "version": "1.0.0"
      },
		(...)
      "rexroth-vpnmanager": {
        "appType": "app",
        "description": "The VPN Client app enables the secure, encrypted communication with one or more end points for a remote maintenance or to\nstream sensitive data. In the basic scope, the synchronous setup of up to two VPN connections is possible.\n",
        "size": 20701184,
        "summary": "Establish VPN connections",
        "title": "VPN Client",
        "vendor": "Bosch Rexroth AG",
        "version": "3.6.1"
      },
      "snapd": {
        "appType": "snapd",
        "description": "Install, configure, refresh and remove snap packages. Snaps are\n'universal' packages that work across many different Linux systems,\nenabling secure distribution of the latest apps and utilities for\ncloud, servers, desktops and the internet of things.\n\nStart with 'snap list' to see installed snaps.\n",
        "size": 46403584,
        "summary": "Daemon and tooling that enable snap packages",
        "vendor": "Canonical",
        "version": "2.68.5.1"
      }
    }
  },
  "system": {
    "cpu": {
      "cores": {
        "core0": {
          "realtime": false
        },
        "core1": {
          "realtime": false
        },
        "core2": {
          "realtime": true
        },
        "core3": {
          "realtime": true
        }
      }
    },
    "hostname": "ctrlxCore-Name",
    "theming": {
      "app": "rexroth-deviceadmin",
      "theme": "default"
    }
  },
  "systemInfo": {
    "architecture": "arm64",
    "macAddress": "...",
    "operatingSystem": "Ubuntu Core 22",
    "osVersion": "22"
  },
  "typePlate": {
    "materialIndex": "BT1",
    "materialNumber": "R123456789",
    "serialNumber": "123456789",
    "storeBrandId": "boschrexroth",
    "storeModelId": "rexroth-arch01",
    "storeSerialId": "urn:ctrlx:device:rexroth:123456789",
    "typeCode": "COREX-C-X3-11-ANNN-21.01-01RS-NN-NN"
  }
}
Customize your Template
Use the retrieved device setup info as your baseline. You can now edit, add, or remove settings before sending the final configuration to create your template.
1 Exclude an App from the Template
If you do not want to include a specific app in your generated template, set its app key value to:
"$content:none"(This explicitly tells the device that the app is mentioned but has no configuration declared, allowing it to be removed)
2 Remove Other Properties
Delete any other properties from your configuration if you do not want to apply them
⚠️ Attention: Removing a property does not reset it on the target device because there is no "reset to factory default values" in the core for this file type, the device will simply maintain its currently active settings
Create the Template
Once you have your deviceId, accountId, and updated template configurations:
Request
 curl --location 'https://api.ctrlx-deviceportal.boschrexroth.com/iot-device-services/v1/tasks' \
-H 'accept: application/json' \
-H 'Content-Type: application/json' \
-H 'Ocp-Apim-Subscription-Key: <YOUR_SUBSCRIPTION_KEY>' \
-H 'Authorization: Bearer <JWT_TOKEN>' \
--data '{
    "type": "DEVICE_TASK",
    "accountId": "<ACCOUNT_ID>",
    "action": "CREATE_DEVICE_TEMPLATE",
    "parameters": {
        //"schedule":{"start":"2026-02-07T10:46:00.000Z"}, //UNCOMMENT THIS IF WE WANT TO SCHEDULE TO EXECUTE THE TASK IN THE DAY DEFINED
        "deviceId": "<DEVICE_ID>",
        "name": "template_1",
        "version": 1,
        "description": "some description", //Description of the template
        "setupInfo" : "{\"$forceReboot\":false,\"$name\":\"\",\"$schema\":\"./setup.v1.schema.json\" (...)}"
    }
}'
Response
 {
    "id": "dddc356e-6812-43a4-8132-d6f917aa8669",
    "type": "DEVICE_TASK",
    "action": "CREATE_DEVICE_TEMPLATE",
    "state": "PENDING",
    "parameters": {
        "deviceId": "<DEVICE_ID>"
    },
    "eta": "2026-01-16T16:16:51Z",
    "updatedAt": "2026-01-16T16:17:13Z"
}
⚠️ Attention: Save the returned response id to be able to track the task template progress
Track Template creation progress
After submitting your creation request, you can follow the progress by it's id (from the create template response)
Request
curl -X 'GET' \
  'https://api.ctrlx-deviceportal.boschrexroth.com/iot-device-services/v1/tasks/<TASK_ID>' \
  -H 'accept: application/json' \
  -H 'Ocp-Apim-Subscription-Key: <YOUR_SUBSCRIPTION_KEY>' \
  -H 'Authorization: Bearer <JWT_TOKEN>'
When the task is completed with success (DONE state) locate the templateId inside the response object. This id uniquely identifies your newly created template
Response
{
  "id": "3c39a8ca-5696-4242-9211-f94b6129dba0",
  "type": "DEVICE_TASK",
  "action": "CREATE_DEVICE_TEMPLATE",
  "state": "DONE",
  "parameters": {
    "deviceId": "<DEVICE_ID>"
  },
  "result": {
    "templateId": "templateId1"
  },
  "eta": "2026-01-16T16:48:29Z",
  "updatedAt": "2026-01-16T16:52:41Z"
}
Get template details
Request
curl -X --location 'https://api.ctrlx-deviceportal.boschrexroth.com/iot-device-services/v1/templates/templateId1' \
  -H 'accept: application/json' \
  -H 'Ocp-Apim-Subscription-Key: <YOUR_SUBSCRIPTION_KEY>' \
  -H 'Authorization: Bearer <JWT_TOKEN>'
Response
 {
  "createdAt": "2026-01-14T17:50:34Z",
  "createdBy": "[email protected]",
  "updatedBy": "[email protected]",
  "configurations": "{\"$description\":\"With node red app\",\"$forceReboot\":false,(...)}",
  "id": "templateId1",
  "type": "CUSTOM",
  "name": "some name",
  "description": "someDescription",
  "version": 2,
  "deviceTypeCode": "COREX-C-X3-11-ANNN-21.01-01RS-NN-NN",
  "compatibleOs": "Ubuntu Core 22",
  "updatedAt": "2026-01-21T15:53:17Z"
}
(The request retrieves all the needed data for the user to then apply the template to a device)
Apply Template
From the Get Template details response, copy the configurations object. This contains the base structure to be applied to your device
Optional: Customize this configurations to fit your current needs. If you want to deploy the template exactly as it was saved, leave this object unchanged
Once your configuration object is ready, make the request to apply the configuration payload to the target device
ℹ️ Note: The configuration value should be JSON escaped string
Request
 curl --location 'https://api.ctrlx-deviceportal.boschrexroth.com/iot-device-services/v1/tasks' \
   -H 'accept: application/json' \
   -H 'Content-Type: application/json' \
   -H 'Authorization: Bearer <JWT_TOKEN>' \
--data '{
    "type": "DEVICE_TASK",
    "accountId": "<ACCOUNT_ID>",
    "action": "APPLY_DEVICE_TEMPLATE",
    "schedule":{"start":"2026-02-07T10:46:00.000Z"}, //REMOVE THIS IF WE WANT TO EXECUTE THE TASK IMMEDIATELY
    "parameters": {
        "restoreOptions" : "OVERRIDE",
        "deviceId": "<DEVICE_ID>",
        "templateId" : "templateId1",
        "configurations": : "{\"$forceReboot\":false,\"$name\":\"\",\"$schema\":\"./setup.v1.schema.json\" (...)}"
    }
}'
Response (when the request was successfully done)
{
    "id": "3c39a8ca-5696-4242-9211-f94b6129dba0",
    "type": "DEVICE_TASK",
    "action": "APPLY_DEVICE_TEMPLATE",
    "state": "RUNNING",
    "parameters": {
        "deviceId": "<DEVICE_ID>"
    },
    "eta": "2026-01-16T16:48:29Z",
    "updatedAt": "2026-01-16T16:48:29Z"
}
With this object the user can follow-up the task progress (if it's PENDING | RUNNING | FAILED)
When the task is successfully finished (state DONE) then the user will be able to see in it's device the properties defined inside the template applied on the device (e.g. apps installed/uninstalled).
Additional Notes - Assign Licenses
Templates API do not include licenses. After triggering the template deployment, ensure that the device has the necessary licenses to function properly via ctrlX Device Portal.
API detailed specifications
In the following sections are explained the APIs endpoints sepecification in more detail to allow the user to make the Templates use cases.
Get Current Device Setup Info
Returns a JSON object with the current apps/system configurations inside a device. It is a simplified access to setup/backup information's suitable for the template creation support.
Request
curl -X 'GET' \ 'https://api.ctrlx-deviceportal.boschrexroth.com/iot-device-services/v1/devices/<DEVICE_ID>/setup/setupinfo' \ -H 'accept: application/json' \ -H 'Ocp-Apim-Subscription-Key: <YOUR_SUBSCRIPTION_KEY>' \ -H 'Authorization: Bearer <JWT_TOKEN>'Response
{
  "$forceReboot": false,
  "$name": "",
  "$schema": "./setup.v1.schema.json",
  "$version": "",
  "apps": {},
	(...)
  "packageManagement": {
    "allowUnknownApps": true,
    "installedApps": {
      "bare": {
        "appType": "base",
        "description": "",
        "size": 4096,
        "summary": "Empty base snap, useful for testing and fully statically linked snaps",
        "vendor": "Canonical",
        "version": "1.0"
      },
		(...)
      "rexroth-deviceagent": {
        "appType": "app",
        "description": "This app is designed to provide device information, allow remote access and software updates.",
        "size": 39555072,
        "summary": "App for remote access and real time updates.",
        "title": "Device Portal Agent",
        "vendor": "",
        "version": "1.0.0"
      },
		(...)
      "rexroth-vpnmanager": {
        "appType": "app",
        "description": "The VPN Client app enables the secure, encrypted communication with one or more end points for a remote maintenance or to\nstream sensitive data. In the basic scope, the synchronous setup of up to two VPN connections is possible.\n",
        "size": 20701184,
        "summary": "Establish VPN connections",
        "title": "VPN Client",
        "vendor": "Bosch Rexroth AG",
        "version": "3.6.1"
      },
      "snapd": {
        "appType": "snapd",
        "description": "Install, configure, refresh and remove snap packages. Snaps are\n'universal' packages that work across many different Linux systems,\nenabling secure distribution of the latest apps and utilities for\ncloud, servers, desktops and the internet of things.\n\nStart with 'snap list' to see installed snaps.\n",
        "size": 46403584,
        "summary": "Daemon and tooling that enable snap packages",
        "vendor": "Canonical",
        "version": "2.68.5.1"
      }
    }
  },
  "system": {
    "cpu": {
      "cores": {
        "core0": {
          "realtime": false
        },
        "core1": {
          "realtime": false
        },
        "core2": {
          "realtime": true
        },
        "core3": {
          "realtime": true
        }
      }
    },
    "hostname": "ctrlxCore-Name",
    "theming": {
      "app": "rexroth-deviceadmin",
      "theme": "default"
    }
  },
  "systemInfo": {
    "architecture": "arm64",
    "macAddress": "...",
    "operatingSystem": "Ubuntu Core 22",
    "osVersion": "22"
  },
  "typePlate": {
    "materialIndex": "BT1",
    "materialNumber": "R123456789",
    "serialNumber": "123456789",
    "storeBrandId": "boschrexroth",
    "storeModelId": "rexroth-arch01",
    "storeSerialId": "urn:ctrlx:device:rexroth:123456789",
    "typeCode": "COREX-C-X3-11-ANNN-21.01-01RS-NN-NN"
  }
}
ℹ️ Note: In the upper response we can have an example (with some parts removed to be more easy to read) of the setupInfo object that the device is currently registering in the cloud, to make it possible to follow if the device configurations changed and, if needed, use this object has the base configuration to create a template.
Save device as template
Allows the user, based on the device setupInfo, to create a customizable template based on the device setup file. This means that the user can choose what he wants to save within the template, so that he can then apply it to other devices.
Request
curl --location 'https://api.ctrlx-deviceportal.boschrexroth.com/iot-device-services/v1/tasks' \
   -H 'accept: application/json' \
   -H 'Content-Type: application/json' \
   -H 'Ocp-Apim-Subscription-Key: <YOUR_SUBSCRIPTION_KEY>' \
   -H 'Authorization: Bearer <JWT_TOKEN>' \
--data '{
    "type": "DEVICE_TASK",
    "accountId": "<ACCOUNT_ID>",
    "action": "CREATE_DEVICE_TEMPLATE",
    "parameters": {
        //"schedule":{"start":"2026-02-07T10:46:00.000Z"}, //UNCOMMENT THIS IF WE WANT TO SCHEDULE TO EXECUTE THE TASK IN THE DAY DEFINED
        "deviceId": "1234567890",
        "name": "template_1",
        "version": 1,
        "description": "some description", //Description of the template
        "setupInfo" : "{\"$forceReboot\":false,\"$name\":\"\",\"$schema\":\"./setup.v1.schema.json\" (...)}"
    }
}'accountId: the account that the user has access and to which the device is associated to;
parameters
schedule: date and time to schedule a task to execute;
deviceId: device that will provide the base configuration from which the template will be created;
name: name of the template that will be created;
version: version of the template that will be created;
description: description of what can be configured inside the template;
setupInfo: the, modified or not, setupInfo escaped json content, that the selected device will use as the base configuration for the template, when creating it.
To retrieve the setupInfo content we need to look into the setupInfo that is being retrieved by the ctrlX Core
from the Device API;
from the Cloud API;
Response
{
    "id": "dddc356e-6812-43a4-8132-d6f917aa8669",
    "type": "DEVICE_TASK",
    "action": "CREATE_DEVICE_TEMPLATE",
    "state": "DONE",
    "parameters": {
        "deviceId": "123456789"
    },
  	"result": {
    	"templateId": "templateId1"
  	},
    "eta": "2026-01-16T16:16:51Z",
    "updatedAt": "2026-01-16T16:17:13Z"
}
When the request is done with success, we should receive an response object like the one mentioned on top.
ℹ️ Note: To follow the tasks status (if it's running or if it finished with success or error) we should save the "id" that is being returned in the response. Also when the task is done a templateId value appears inside the result field object, so when the task is done we can use that value to see the template details and, and if needed, to apply the created template to a device.
Get template details
Gets the details of a certain template, and the configurations that it has inside the template to make it possible to apply to any device.
Request
{
  "createdAt": "2026-01-14T17:50:34Z",
  "createdBy": "[email protected]",
  "updatedBy": "[email protected]",
  "configurations": "{\"$description\":\"With node red app\",\"$forceReboot\":false,(...)}",
  "id": "test",
  "type": "CUSTOM",
  "name": "some name",
  "description": "someDescription",
  "version": 2,
  "deviceTypeCode": "COREX-C-X3-11-ANNN-21.01-01RS-NN-NN",
  "compatibleOs": "Ubuntu Core 22",
  "updatedAt": "2026-01-21T15:53:17Z"
}
Response
{
  "createdAt": "2026-01-14T17:50:34Z",
  "createdBy": "[email protected]",
  "updatedBy": "[email protected]",
  "configurations": "{\"$description\":\"With node red app\",\"$forceReboot\":false,(...)}",
  "id": "test",
  "type": "CUSTOM",
  "name": "some name",
  "description": "someDescription",
  "version": 2,
  "deviceTypeCode": "COREX-C-X3-11-ANNN-21.01-01RS-NN-NN",
  "compatibleOs": "Ubuntu Core 22",
  "updatedAt": "2026-01-21T15:53:17Z"
}
Get task by Id
This method allows to follow the state of a specific task that was previously created
Request
curl -X 'GET' \
  'https://api.ctrlx-deviceportal.boschrexroth.com/iot-device-services/v1/tasks/<TASK_ID>' \
  -H 'accept: application/json' \
  -H 'Ocp-Apim-Subscription-Key: <YOUR_SUBSCRIPTION_KEY>' \
  -H 'Authorization: Bearer <JWT_TOKEN>'
Response
{
  "id": "3c39a8ca-5696-4242-9211-f94b6129dba0",
  "type": "DEVICE_TASK",
  "action": "CREATE_DEVICE_TEMPLATE",
  "state": "DONE",
  "parameters": {
    "deviceId": "<DEVICE_ID>"
  },
  "result": {
    "templateId": "templateId1"
  },
  "eta": "2026-01-16T16:48:29Z",
  "updatedAt": "2026-01-16T16:52:41Z"
}
If the task is found inside the Cloud DB we should have a similar object as the one mentioned above. The see if the task is running or not we should look into the "state" field inside the object, since this will tell the following:
PENDING: the device is still in the process of receiving the message to apply the device template;
RUNNING: the device has received the message and it already started to process it;
DONE: the device has finished to apply the template and it finished with success;
When the task reaches this state a new property templateId is added inside the result object to mention the id of the template that was created in the cloud environment for later to be applied (this is only for the tasks that has the action: CREATE_DEVICE_TEMPLATE).
FAILED: during the apply template the system detected an error and it failed the apply template process.
Apply device template
Applying a previously created device template to any device available on the user account.
Request
curl --location 'https://api.ctrlx-deviceportal.boschrexroth.com/iot-device-services/v1/tasks' \
   -H 'accept: application/json' \
   -H 'Content-Type: application/json' \
   -H 'Ocp-Apim-Subscription-Key: <YOUR_SUBSCRIPTION_KEY>' \
   -H 'Authorization: Bearer <JWT_TOKEN>' \
--data '{
    "type": "DEVICE_TASK",
    "accountId": "<ACCOUNT_ID>",
    "action": "APPLY_DEVICE_TEMPLATE",
    "schedule":{"start":"2026-02-07T10:46:00.000Z"}, //REMOVE THIS IF WE WANT TO EXECUTE THE TASK IMMEDIATELY
    "parameters": {
        "restoreOptions" : "OVERRIDE",
        "deviceId": "<DEVICE_ID>",
        "templateId" : "dddc356e-6812-43a4-8132-d6f917aa8669",
        "configurations": : "{\"$forceReboot\":false,\"$name\":\"\",\"$schema\":\"./setup.v1.schema.json\" (...)}"
    }
}'
Request requirements:
accountId: the account that the user has access and to which the device is associated to;
parameters
schedule: date and time to schedule a task to execute (it's not mandatory; if not value is provided the task will be executed right away);
restoreOptions: this will tell if we want to OVERRIDE the configurations into the device or MERGE with some configuration that the device can already possibly have.
deviceId: device where the template will be applied;
templateId: the Id of the previously created template that will be applied to the defined deviceId;
configurations: the, modified or not, template escaped json content, that the selected device will receive to apply
To retrieve the template configurations content we need to previously make the get template details request to the cloud.
Response
{
    "id": "3c39a8ca-5696-4242-9211-f94b6129dba0",
    "type": "DEVICE_TASK",
    "action": "APPLY_DEVICE_TEMPLATE",
    "state": "SCHEDULED",
    "parameters": {
        "deviceId": "123456789"
    },
    "eta": "2026-01-16T16:48:29Z",
    "updatedAt": "2026-01-16T16:48:29Z"
}
If the request of applying an template was done with success we should receive a similar object to the one defined above.
ℹ️ Note: From this object we should save the "id" property that will allow in the next requests, to follow-up if the task has finished or is still running.
Get Device details
Allows the user to see the metadata of a certain device, by it's deviceId, and most important be able to see if the device is ONLINE or not.
Request
curl --location 'https://api.ctrlx-deviceportal.boschrexroth.com/iot-device-services/v1/devices/1234567890' \
   -H 'Accept: application/json' \
   -H 'Ocp-Apim-Subscription-Key: <YOUR_SUBSCRIPTION_KEY>' \
   -H 'Authorization: Bearer <JWT_TOKEN>'
Response
{
    "id": "1234567890",
    "accountId": "account1",
    "name": "ctrlxCore-IN-PRODUCTION",
    "status": "ONLINE",
    "materialNumber": "R987654321",
  	"typeCode": "TYPE-XYZ",
  	"description": "This is my device used for testing.",
  	"manufacturingDate": "2024-01-01T12:00:00Z",
  	"operatingSystem": "FWA_ControlX",
  	"operatingSystemVersion": "22",
  	"lastCommunication": "2024-05-28T02:14:28.0000000+00:00",
  	"lastModified": "2024-05-28T02:14:28.0000000+00:00"
}
Additional Notes - Assign Licenses
Templates API do not include licenses. After triggering the template deployment, ensure that the device has the necessary licenses to function properly via ctrlX Device Portal.