Overview
LabJack devices are accessed using the native LabJack LJM library. Python applications use the labjack-ljm Python wrapper to communicate with this library.
On ctrlX CORE, the native library, Python application and required configuration files must be packaged inside a snap.
Here is the simpler way to install LabJack LJM library in ctrlX OS to communicate with the LabJack T7 device.
OverviewPrerequisitesHardwareSoftwareNetwork configurationStep 1: Create the project structureStep 2: Create the python scriptStep 3: Create snapcraft YAML fileStep 4: Build the snapStep 5: Install the snap on ctrlX COREStep 5: Check the logbook for the outputRelated links
Prerequisites
Hardware
ctrlX CORE X3/X5/X7
LabJack T7
Engineering PC
Ethernet Cables
Signal source for testing AIN0 and AIN1 on LabJack T7
Software
ctrlX OS v3.6
ctrlX WORKS v3.6
App Build Enviornment
Snapcraft
LabJack LJM 1.23.4 Linux x64 Package
Python 3.10
Network configuration
The ctrlX CORE and LabJack T7 must be reachable on the same network. For example -
ctrlX CORE - 192.168.1.1
LabJack T7 - 192.168.1.9
Step 1: Create the project structure
Download the LabJack LJM installer for Linux x64 (same as our app build environment) from this external link -- https://support.labjack.com/docs/ljm-software-installer-downloads-t4-t7-t8-digit
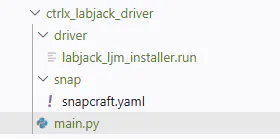
After download, extract the zip file and place the installer file under the folder named 'driver'
Create the project structure as shown in the image
Step 2: Create the python script
Create the python script with the name 'main.py' and place it at the root location of the project folder.
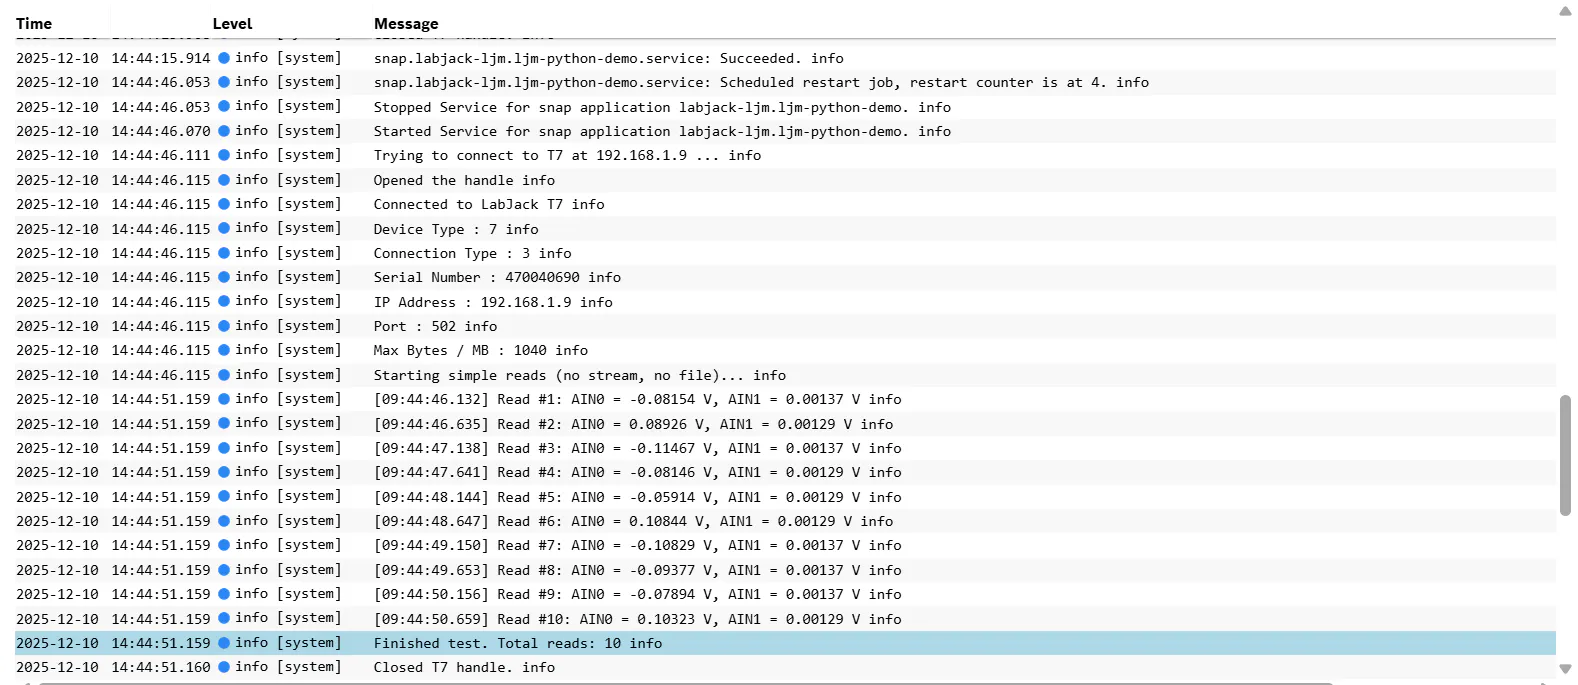
This python script acts as a wrapper for the LJM library. It tries to establish the connection with LabJack T7, get the device info and reads both analog input channels every 500 milliseconds.
import time
from datetime import datetime
from labjack import ljm

DEVICE_IP = "192.168.1.9"
CHANNEL_NAMES = ["AIN0", "AIN1"]
READ_INTERVAL = 0.5
TEST_DURATION = 5


def main():
    handle = None

    try: # Open T7 over Ethernet using fixed IP
        print(f"Trying to connect to T7 at {DEVICE_IP} ...", flush=True)
        handle = ljm.open(ljm.constants.dtT7, ljm.constants.ctETHERNET, DEVICE_IP)

        print(f"Opened the handle", flush=True) # Get and print device info

        dev_type, conn_type, serial, ip_int, port, max_bytes = ljm.getHandleInfo(handle)
        print(" Connected to LabJack T7")
        print(f" Device Type : {dev_type}")
        print(f" Connection Type : {conn_type}")
        print(f" Serial Number : {serial}")
        print(f" IP Address : {ljm.numberToIP(ip_int)}")
        print(f" Port : {port}")
        print(f" Max Bytes / MB : {max_bytes}", flush=True)
        print("\nStarting simple reads (no stream, no file)...", flush=True)

        start_time = time.time() read_count = 0
        while time.time() - start_time < TEST_DURATION: # Read all requested channels in one call
            values = ljm.eReadNames(handle, len(CHANNEL_NAMES), CHANNEL_NAMES)
            read_count += 1
            ts = datetime.now().strftime("%H:%M:%S.%f")[:-3]
            line = f"[{ts}] Read #{read_count}: " + ", ".join( f"{name} = {val:.5f} V" for name, val in zip(CHANNEL_NAMES, values) )
            print(line)

            time.sleep(READ_INTERVAL)

        print(f"\nFinished test. Total reads: {read_count}", flush=True)

    except ljm.LJMError as e:
        print(" LJM Library Error:", e, flush=True)

    except Exception as e:
        print(" Unexpected Error:", e, flush=True)

    finally:
        if handle is not None:
            try:
                ljm.close(handle)
                print("Closed T7 handle.", flush=True)

            except Exception:
                print("Got an expection while closing handle", flush=True)


if __name__ == "__main__":
    main()
Step 3: Create snapcraft YAML file
Create the snapcraft.yaml and place it under the 'snap' folder
name: ctrlx-labjack-ljm
base: core22
version: '1.2'
summary: LabJack LJM driver for ctrlX CORE
description: LabJack LJM runtime (C library) packaged for ctrlX CORE. GUI tools are stripped.
grade: stable
confinement: strict

architectures:
  - build-on: [amd64, arm64]
    build-for: [amd64]
  - build-on: [amd64, arm64]
    build-for: [arm64]

parts:
  ljm:
    plugin: dump
    source: ./driver
    stage-packages:
      - libusb-1.0-0
    #   - libstdc++6
    #   - libc6
    override-build: |
      set -eux

      cd "$SNAPCRAFT_PART_SRC"

      chmod +x ./labjack_ljm_installer.run

      ### Install into the snap's filesystem (not the host)

      ./labjack_ljm_installer.run --accept --quiet --target "$SNAPCRAFT_PART_INSTALL/usr/local"

      ### Remove GUI app (Kipling) and host-specific bits we don't want on ctrlX.
      rm -rf "$SNAPCRAFT_PART_INSTALL/usr/local/labjack_kipling" || true
      rm -f  "$SNAPCRAFT_PART_INSTALL/usr/local/bin/labjack_kipling" || true
      rm -rf "$SNAPCRAFT_PART_INSTALL/opt" || true

      echo "Installed LabJack LJM into $SNAPCRAFT_PART_INSTALL/usr/local"

      ### Add a small test script for runtime verification
      mkdir -p "$SNAPCRAFT_PART_INSTALL/bin"
      cat > "$SNAPCRAFT_PART_INSTALL/bin/ljm-info" << 'EOF'
      #!/bin/sh
      export LD_LIBRARY_PATH="$SNAP/usr/local/ljm/lib:$SNAP/usr/local/lib:$LD_LIBRARY_PATH"
      echo "LJM libs:"
      ls -l "$SNAP/usr/local/ljm/lib"/libLabJackM.so* 2>/dev/null || echo "libLabJackM not found"

      echo "LJM driver installed inside snap at: $SNAP/usr/local"
      echo "Files:"

      ls -1 "$SNAP/usr/local" || true
      EOF

      chmod +x "$SNAPCRAFT_PART_INSTALL/bin/ljm-info"

  python-ljm:
    plugin: python
    source: .
    # Install LabJack's Python package (gives you `from labjack.ljm import ljm`)
    python-packages:
      - LabJackPython
    after: [ljm]
    override-build: |
      set -eux
      snapcraftctl build

      # Place your script inside the snap (adjust name/path as you like)
      mkdir -p "$SNAPCRAFT_PART_INSTALL/app"
      cp main.py "$SNAPCRAFT_PART_INSTALL/app/main.py"

      # Wrapper to run the script with correct env + library path
      mkdir -p "$SNAPCRAFT_PART_INSTALL/bin"
      cat > "$SNAPCRAFT_PART_INSTALL/bin/ljm-python-demo" << 'EOF'

      #!/bin/sh
      # Make sure LJM's shared library is visible to Python
      export LD_LIBRARY_PATH="$SNAP/usr/local/ljm/lib:$SNAP/usr/local/lib:$LD_LIBRARY_PATH"
      exec "$SNAP/usr/bin/python3" "$SNAP/app/main.py"
      EOF
      chmod +x "$SNAPCRAFT_PART_INSTALL/bin/ljm-python-demo"

apps:
  ljm-python-demo:
    command: bin/ljm-python-demo
    environment:
      LD_LIBRARY_PATH: "$SNAP/usr/local/ljm/lib:$SNAP/usr/local/lib:$LD_LIBRARY_PATH"
    plugs:
      - raw-usb
      - network
      - hardware-observe

plugs:
  raw-usb:
    interface: raw-usb
  hardware-observe:
    interface: hardware-observe
Step 4: Build the snap
From the project root, run:
snapcraft clean
snapcraft
After the successful packaging, the generated file should be similar to:
ctrlx-labjack-ljm_1.2.0_amd64.snap
Download the file to your computer
Step 5: Install the snap on ctrlX CORE
Open the ctrlX OS web interface and follow these steps:
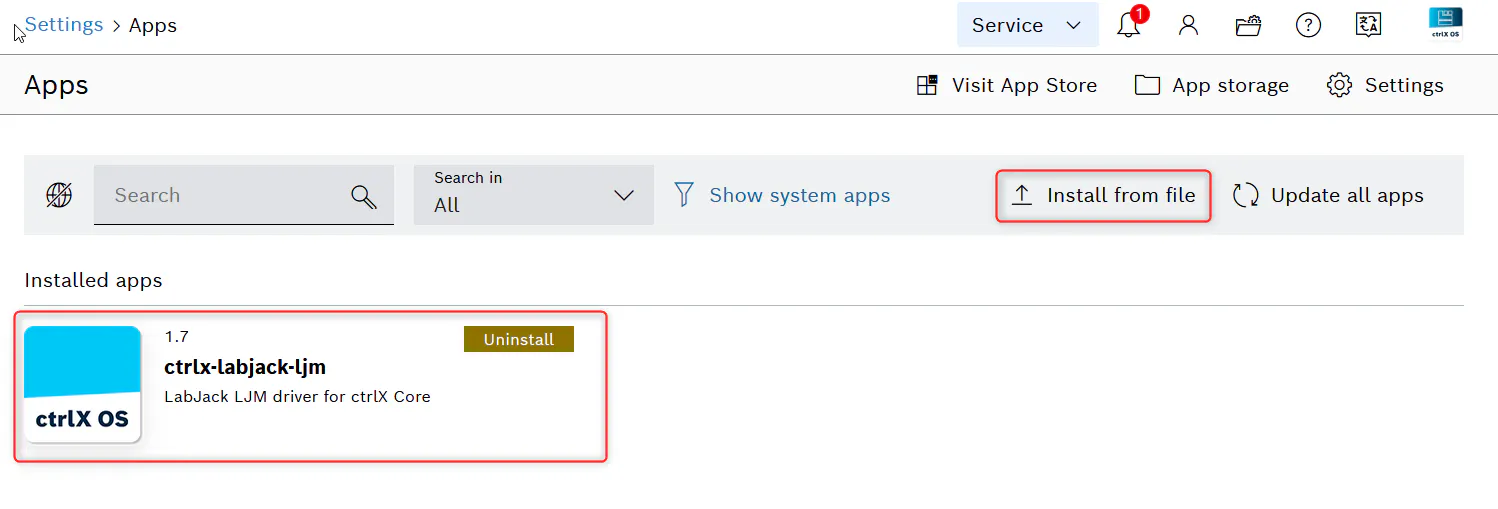
Open Settings
Open Apps
Select Install from file
Select
labjack-ljm_1.0.0_amd64.snapComplete the installation
Step 5: Check the logbook for the output