OverviewPrerequisitesStepsStep 1: Understand the Overall WorkflowStep 2: Install the EPLAN Add-on in ctrlX IO EngineeringStep 3: Configure the EPLAN Project and define the Hardware TopologyStep 4: Export the AML File from EPLANStep 5: Import the AML File into ctrlX IO EngineeringStep 6: Integrate your configuration in ctrlX PLC EngineeringConclusion
Overview
This guide explains how to use the AutomationML (AML) interface to transfer a complete hardware topology and signal structure from EPLAN Electric P8 into ctrlX IO Engineering and ctrlX PLC Engineering. By following this model-driven workflow, you eliminate manual re-entry and ensure consistent, lossless data exchange across all engineering disciplines.
Prerequisites
EPLAN Electric P8 (2025 Update 3 or later) installed and licensed
ctrlX IO Engineering (version 3.6.3 or later) installed
ctrlX PLC Engineering installed
Administrator rights on the engineering PC to install Add-ons
Bosch Rexroth AG EPLAN add-on (v1.4.0.0 or later) available for installation
GSD/GSDML device description files for all fieldbus devices
An EPLAN project containing the target hardware (controllers, bus couplers, IO modules)
Steps
Step 1: Understand the Overall Workflow
Before starting, review the end-to-end data flow to understand how tools interact.
Identify the three main tools: EPLAN Electric P8, ctrlX IO Engineering, and ctrlX PLC Engineering.
Note that EPLAN exports hardware data as an AML file, which both ctrlX IO Engineering and ctrlX PLC Engineering consume.
Verify that EtherCAT bus data flows from ctrlX IO Engineering into the ctrlX OS Data Layer via ctrlX PLC Engineering.
Confirm that PROFINET and EtherNet/IP topologies are also supported through the same AML import path.
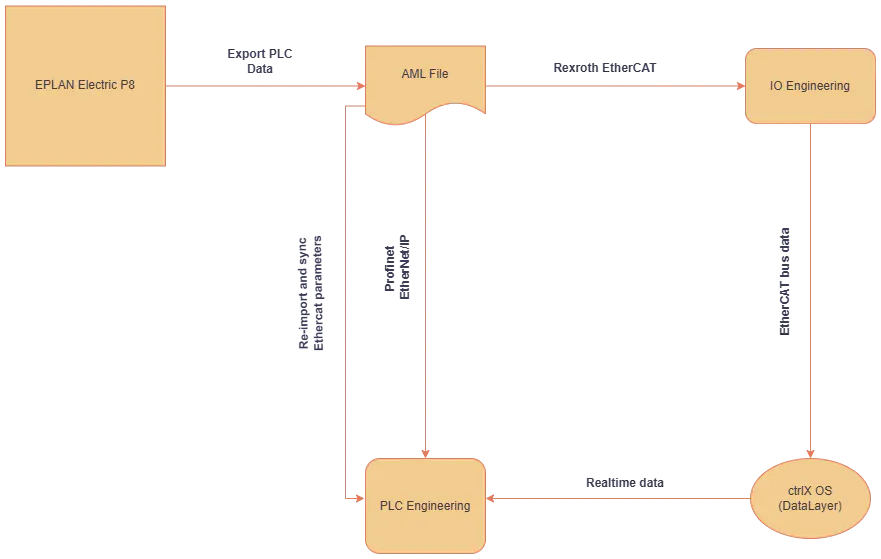
Architecture diagram showing EPLAN exporting AML to IO Engineering and PLC Engineering via EtherCAT and Profinet/EtherNet/IP
Step 2: Install the EPLAN Add-on in ctrlX IO Engineering
Install the Bosch Rexroth AG EPLAN add-on to enable the EPLAN import menu in ctrlX IO Engineering. The EPLAN Add-on must be installed manually:
Open ctrlX IO Engineering and navigate to 'Tools → Add-on Installer.
Select the Browse tab, search for "Bosch Rexroth AG EPLAN", and click Install:
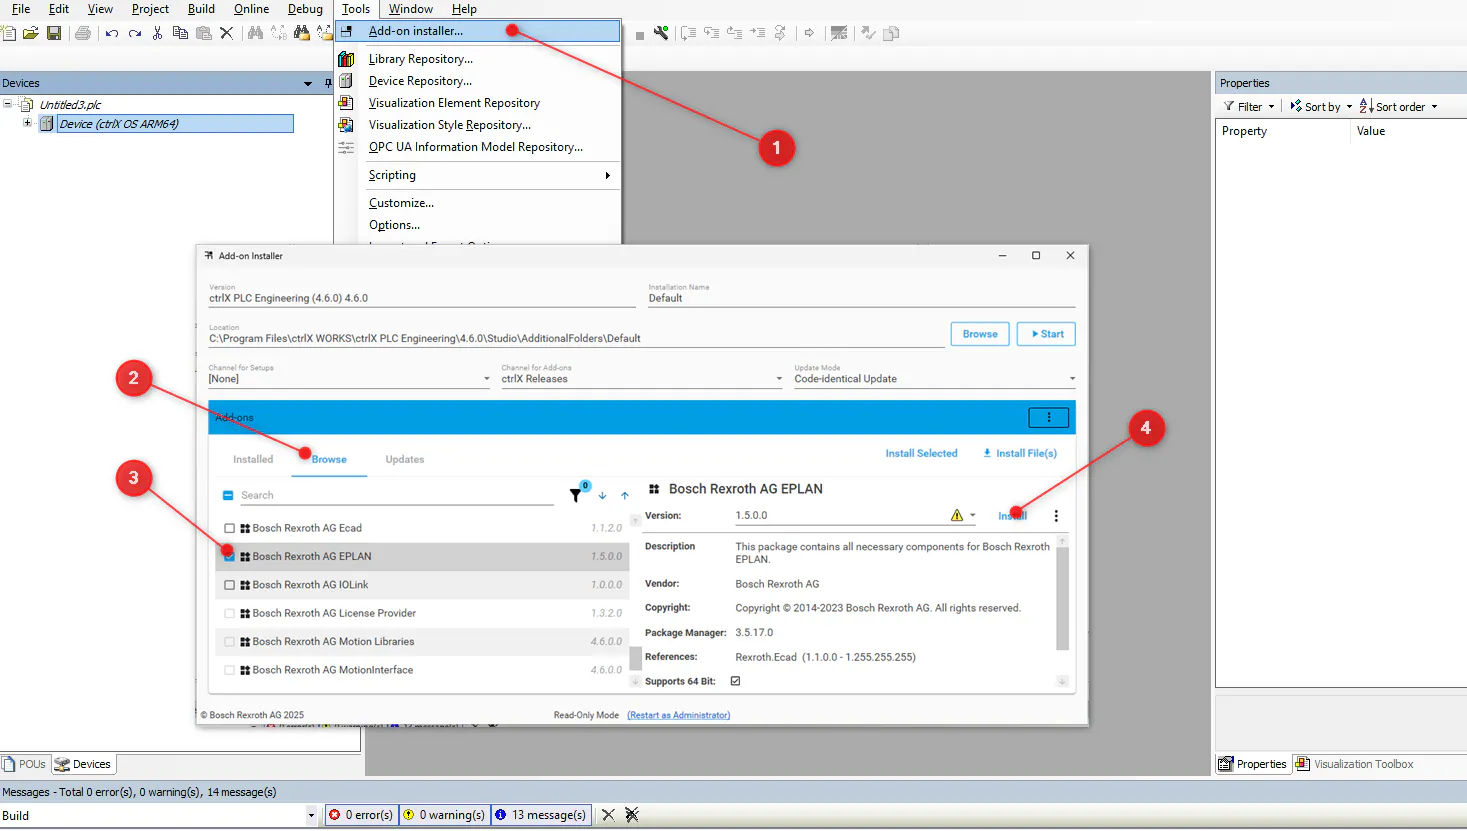
Add-on Installer in ctrlX IO Engineering
Opening the Add-on Installer in ctrlX IO Engineering, browse and select EPLAN
Follow the steps to install the addon.
If you open the "Add-On installer..." again, the EPLAN should be listed in "Installed"
Step 3: Configure the EPLAN Project and define the Hardware Topology
Set up the EPLAN Electric P8 project so that all hardware data is correctly structured for AML export.
Add all required hardware controllers, bus couplers, and IO modules by using macros or the component selection dialog.
Define the bus topology in the single-line view and configure bus connections for the main functions of each macro.
Assign station names, CPU names, rack names, and PLC card positions consistently in the tabular editor using the "Physical Rack Layout" schema.
Consult the EPLAN TechTip "PLC data exchange" (eplan.help) for detailed field definitions and recommended property dialog settings.
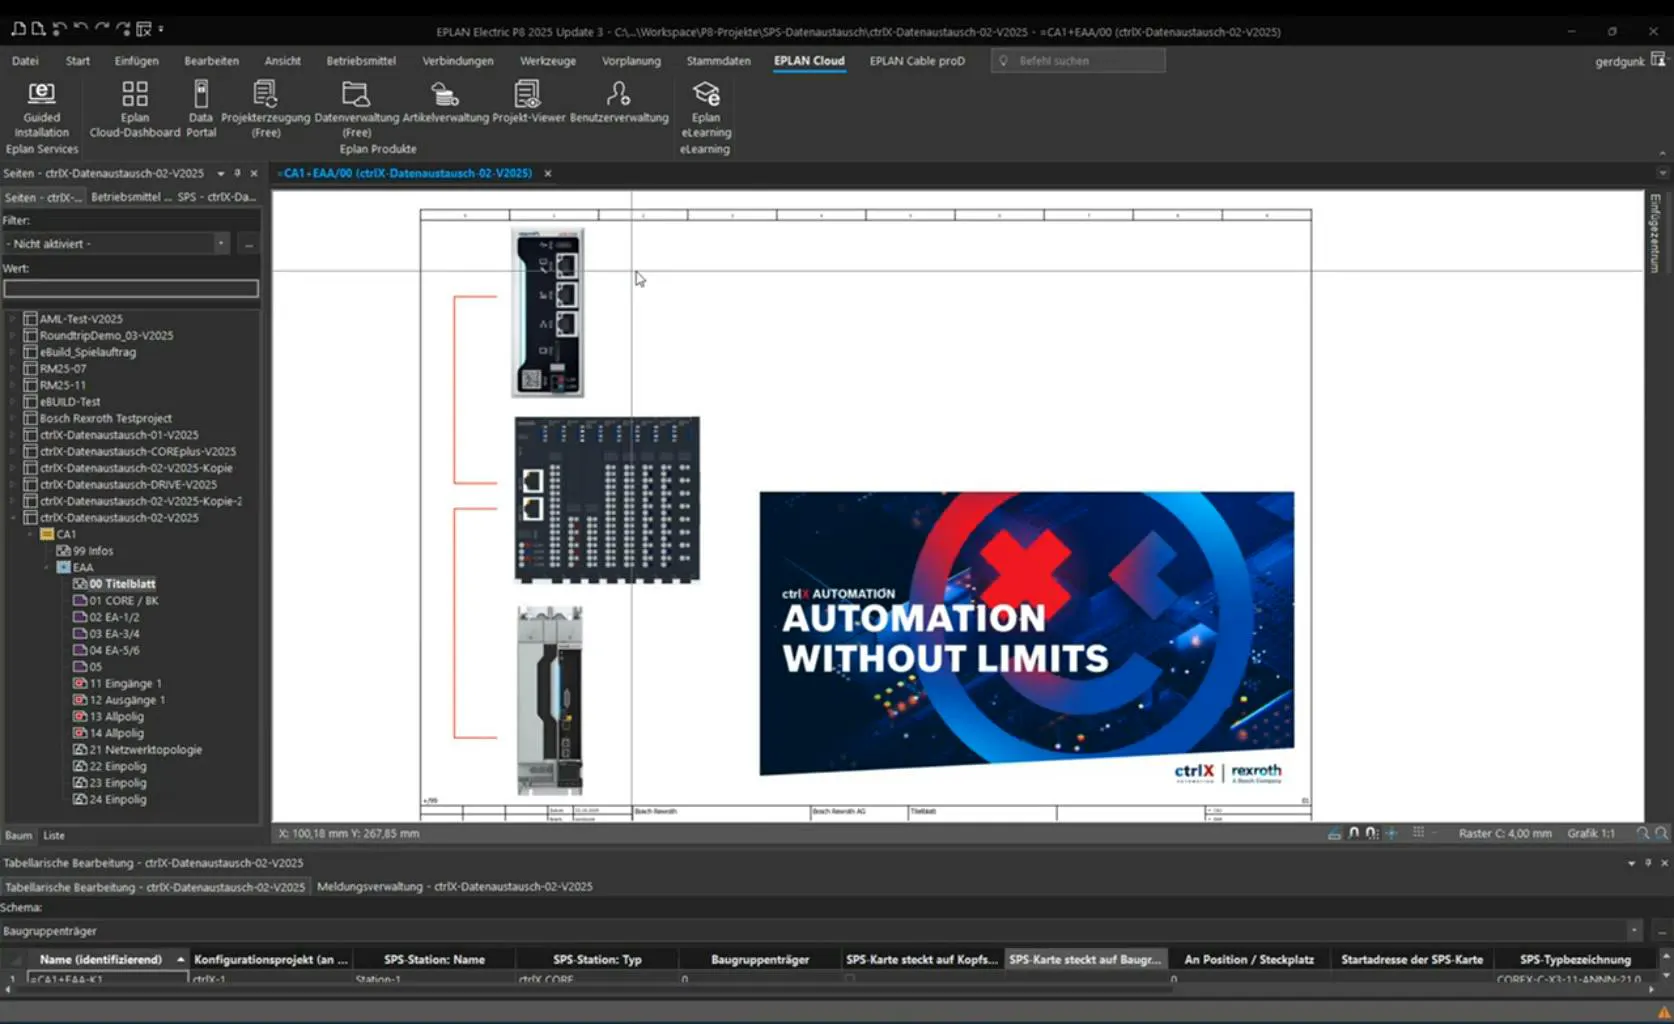
EPLAN Electric P8 showing ctrlX hardware components in the project tree and tabular editor with station data
EPLAN project with hardware components placed
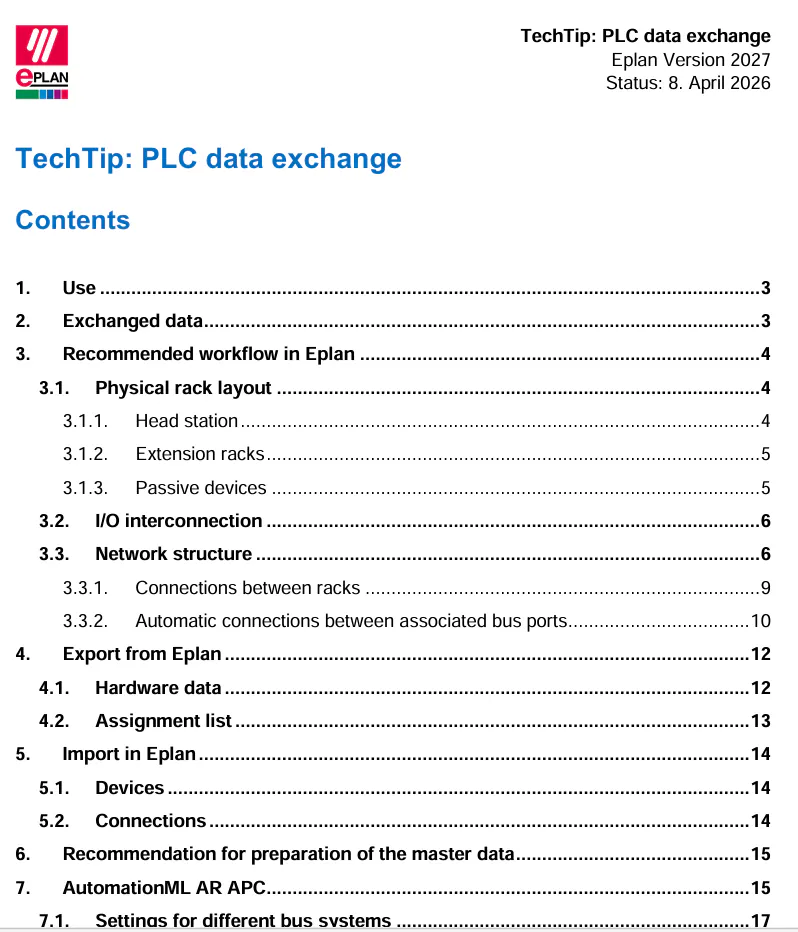
PDF cover page of the EPLAN TechTipp SPS-Datenaustausch guide showing table of contents
EPLAN TechTip PLC-Data transfer reference document
Use single-line PLC boxes as main functions:
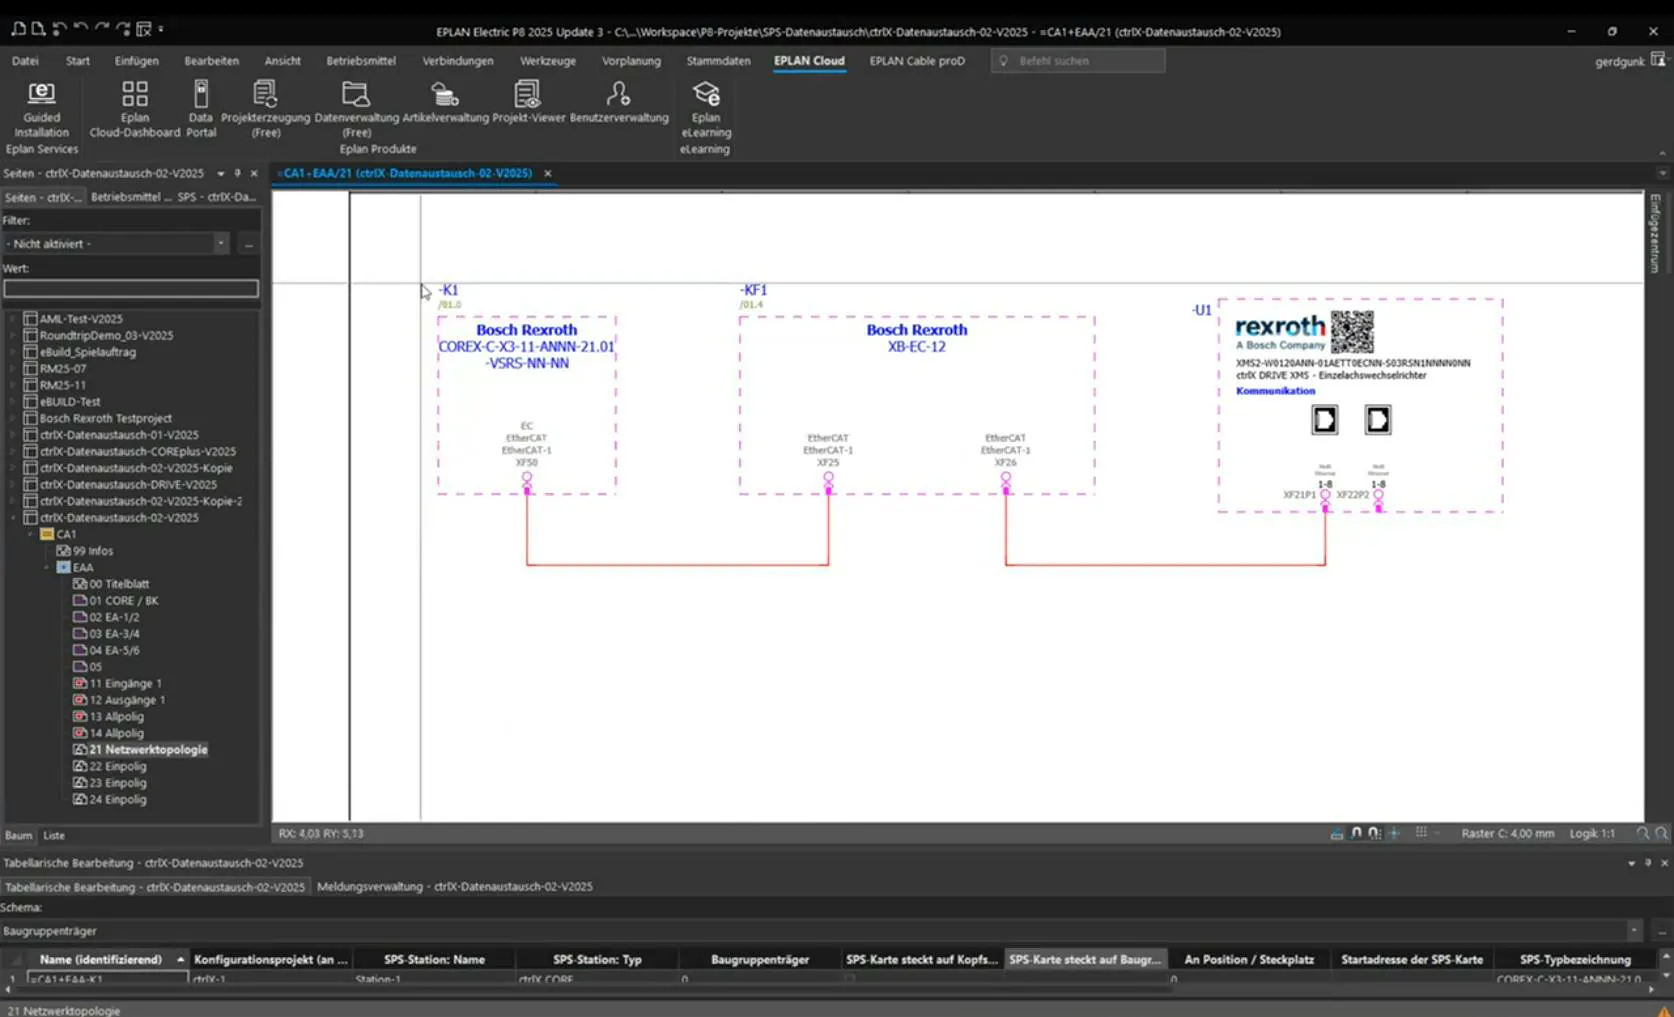
EPLAN schematic page 21 showing ctrlX CORE, XB-EC-12 bus coupler, and ctrlX DRIVE connected via EtherCAT
Network topology page showing EtherCAT connections
To define your export, use the "edit in table" function to add export names, stations names, etc.
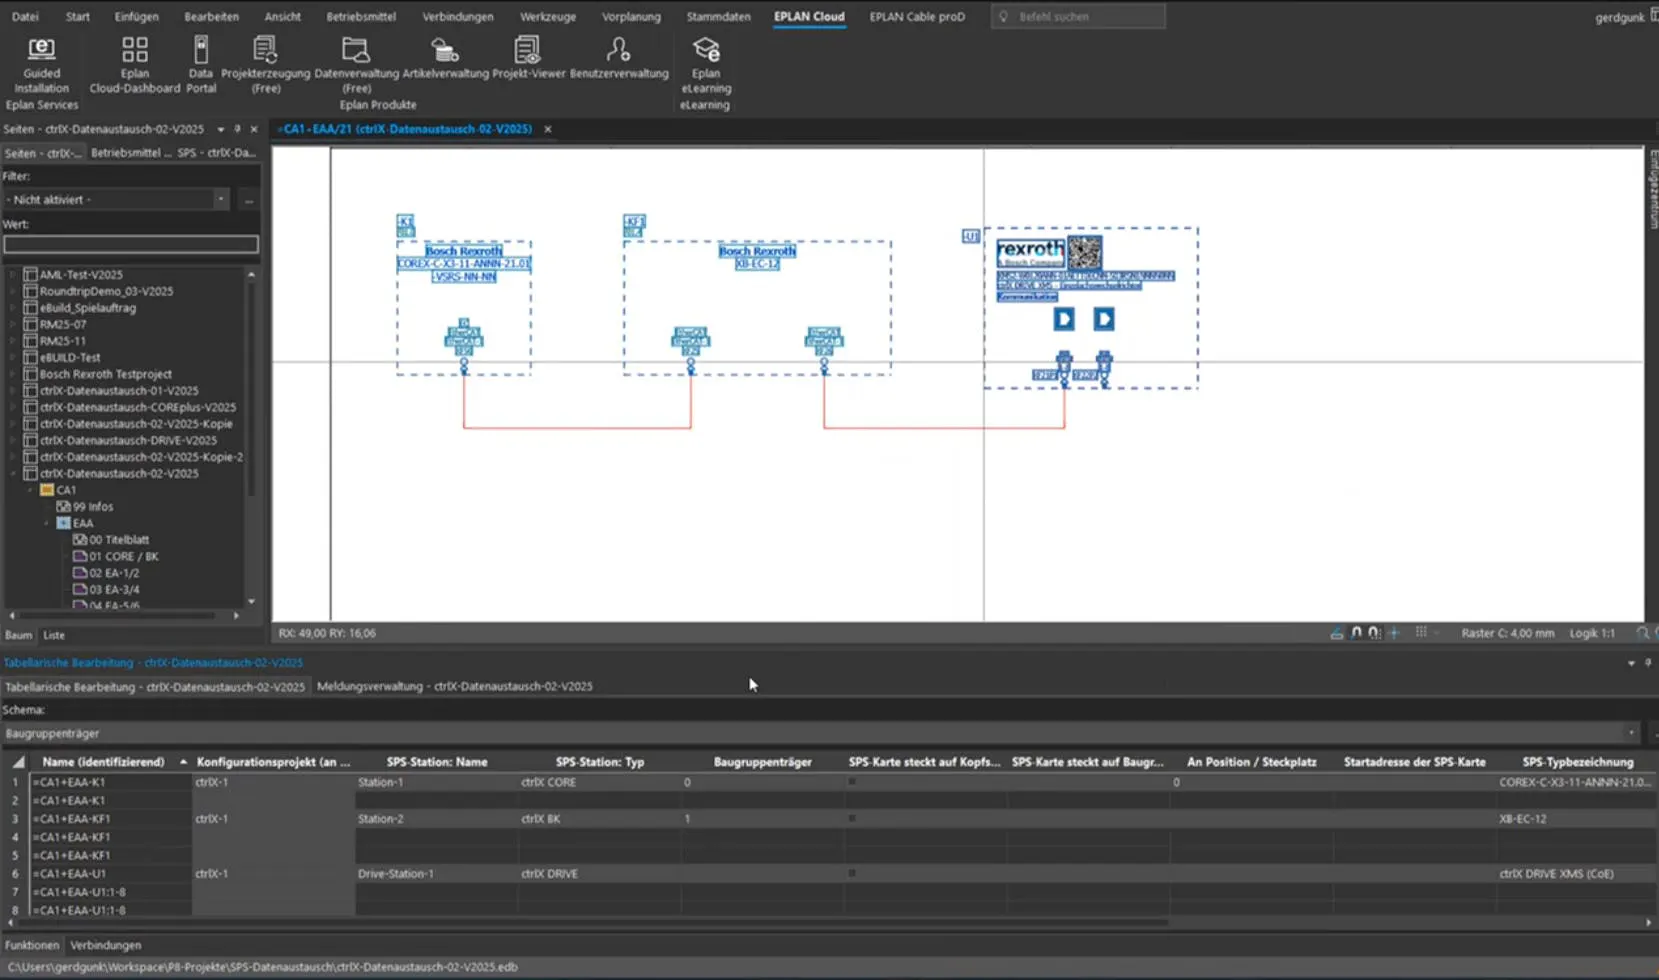
EPLAN tabular editor listing ctrlX CORE, BK, and DRIVE with station names, types, and rack data filled in
Editor is showing rack and station assignments
Step 4: Export the AML File from EPLAN
Generate the AutomationML export file that will be used by ctrlX IO Engineering and ctrlX PLC Engineering.
In EPLAN, open the PLC data export dialog (Tools→ PLC Data Exchange).
Verify the export settings, including the target file path and the AML format selection.
Run the export and confirm that the AML file is saved to the specified location.
Check that no errors are reported; resolve any missing device data or property warnings before proceeding.
Step 5: Import the AML File into ctrlX IO Engineering
Use the EPLAN import function in ctrlX IO Engineering to create the device configuration automatically.
In ctrlX IO Engineering, select EPLAN → Create Project from EPLAN (or use the EPLAN menu added by the add-on).
Browse to the exported AML file and specify the project name and save location, then click "Create Project".
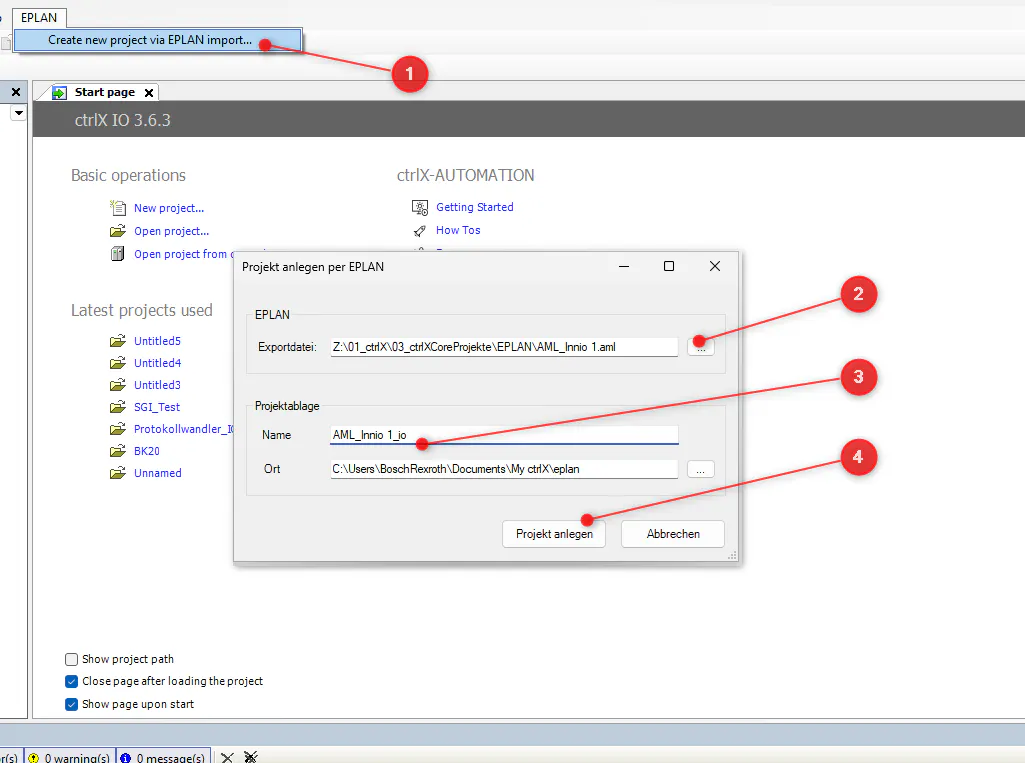
Create Project via AML file
Create Project from EPLAN dialog in ctrlX IO Engineering
Review the Import from EPLAN dialog: all devices should show a green check mark; investigate any warnings about missing device descriptions.
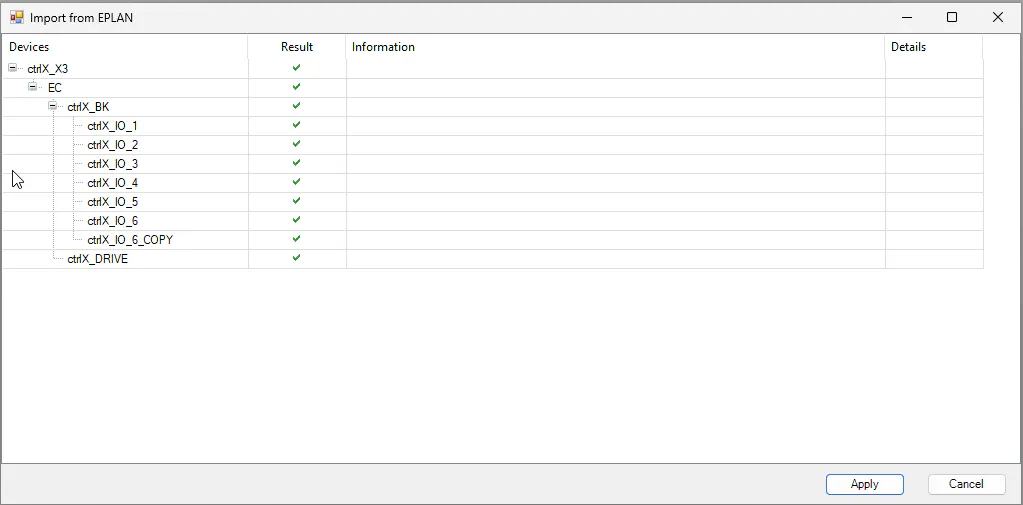
Import summary from EPLAN dialog, listing all imported components.
Import result showing all devices imported successfully
Click "Apply" to complete the import; the project will be generated automatically:
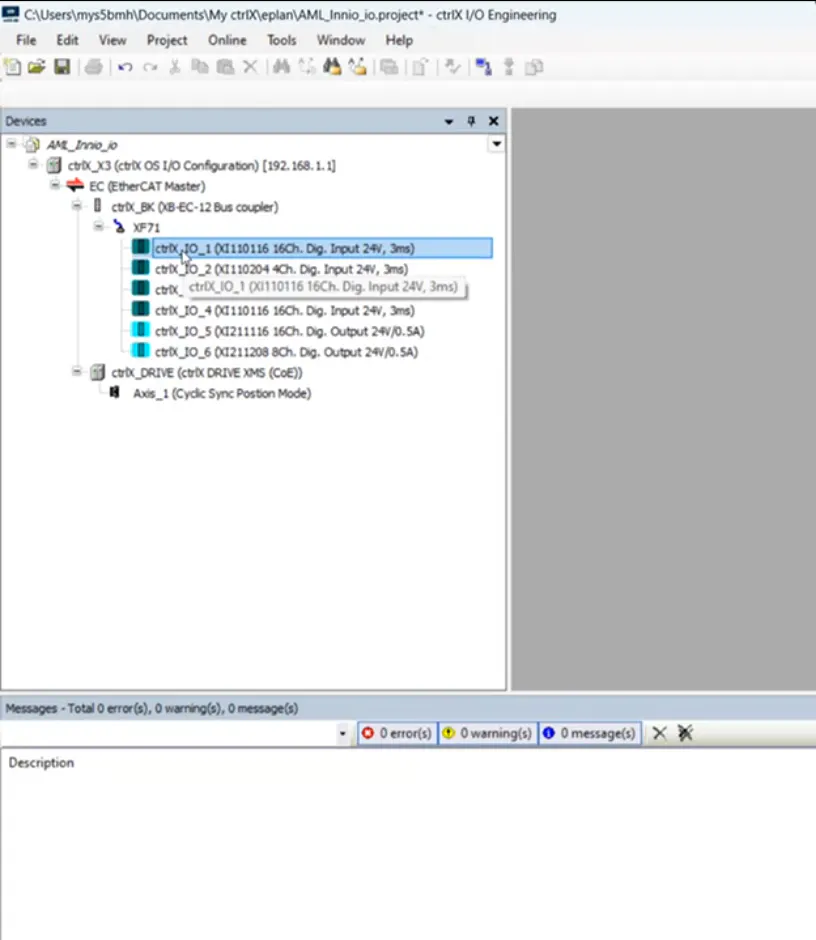
ctrlX IO Engineering Devices panel showing ctrlX_X3 with EtherCAT master, XB-EC-12 bus coupler, six IO modules, and ctrlX DRIVE
Resulting device tree in ctrlX IO Engineering
Now you can download the configuration into the device.
Step 6: Integrate your configuration in ctrlX PLC Engineering
Your configuration is stored in the Data Layer. Now you can configure your ctrlX PLC Engineering project:
Open ctrlX PLC Engineering and create a new project or open an existing project
Connect your project to the device
Right click on "Datalayer_Realtime" and select "Selectively from ctrlX Core":
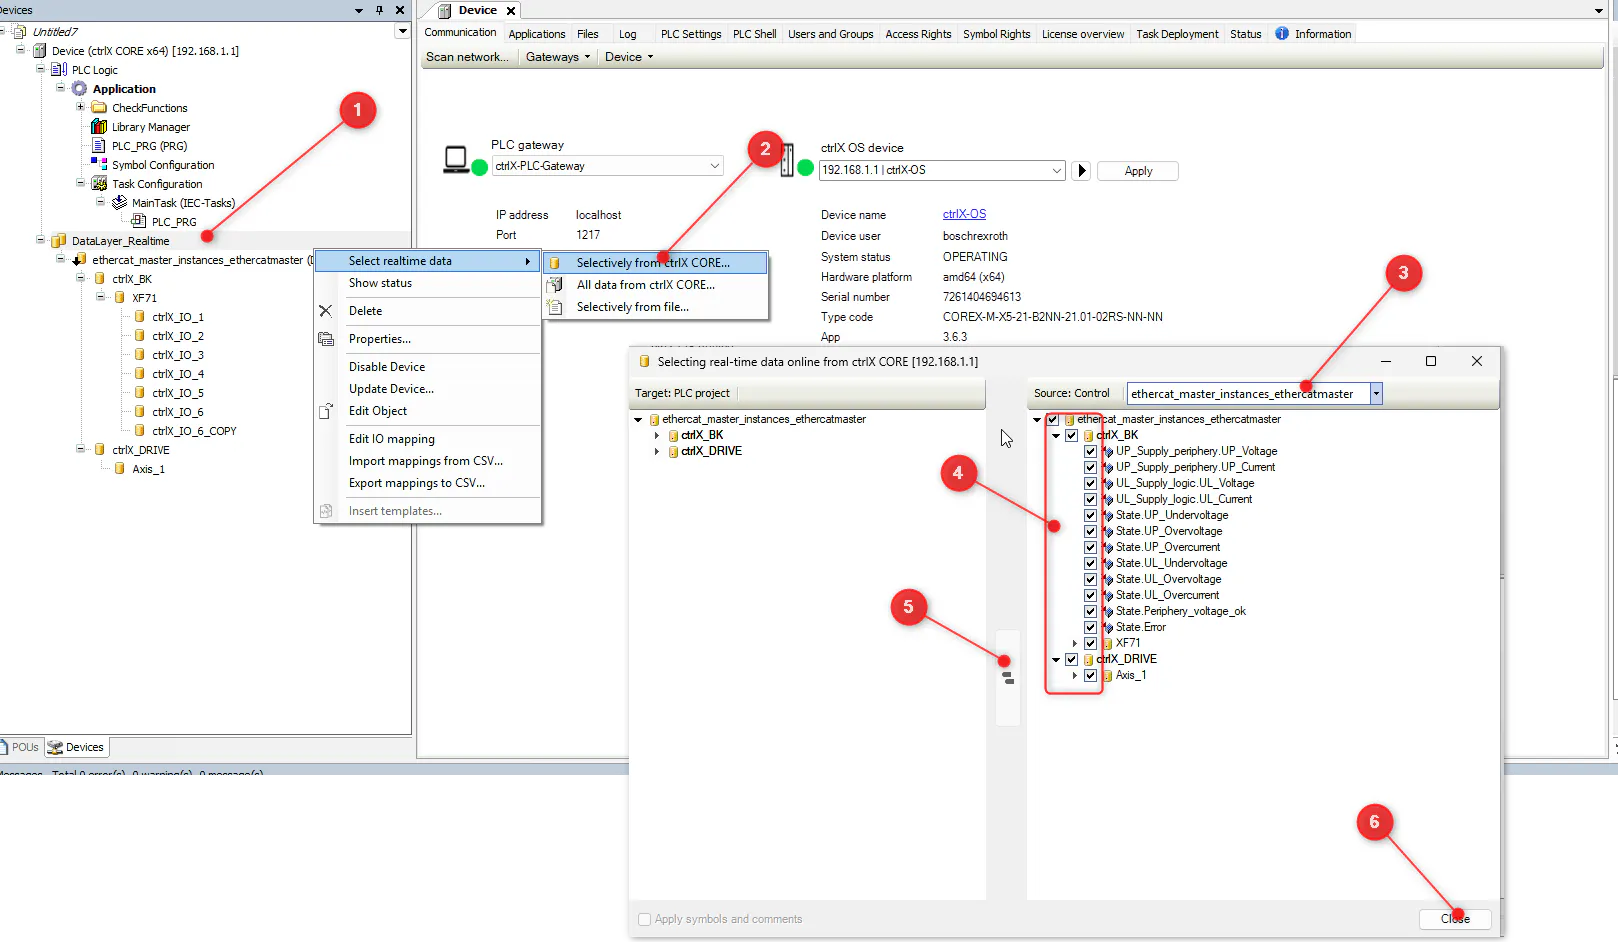
Importing the Inputs/Outputs to PLC Engineering
Importing the Inputs/Outputs to ctrlX PLC Engineering
Check all inputs and outputs then select "Apply" button in the middle and close the dialog.
Your inputs and outputs are added to your project explorer and the configuration is complete.
Conclusion
By leveraging the Bosch Rexroth EPLAN add-on and the AutomationML interface, you can automatically transfer into complete hardware topology and signal structure from EPLAN Electric P8 into ctrlX IO Engineering and ctrlX PLC Engineering, eliminating manual re-entry and enabling a consistent, end-to-end engineering workflow.